Last Watch - Getting Started Guide

This guide will introduce the key concepts and features of Last Watch by walking through a very basic setup. More advanced features will also be introduced at the end of this guide. If you have not installed Last Watch yet, please refer to the setup guide.
1. Detection Profiles
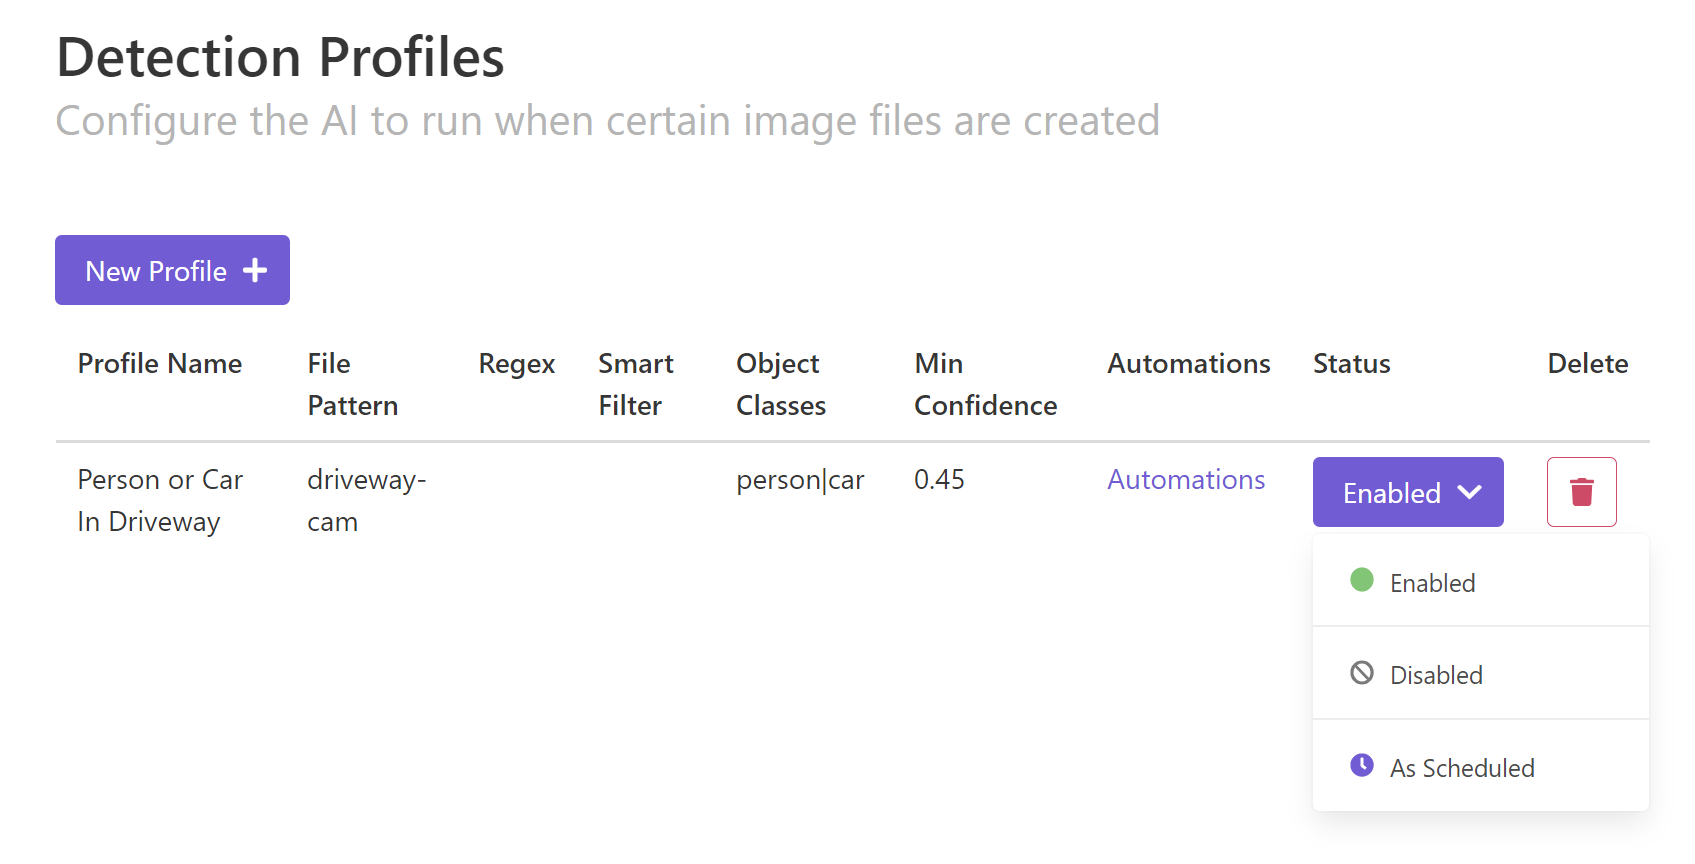
The first step to building automations is to create a Detection Profile. These profiles are how you define which image files Last Watch will look for, and what types of objects to search for in those images. You can think of profiles as filters that sort out the image events coming in.
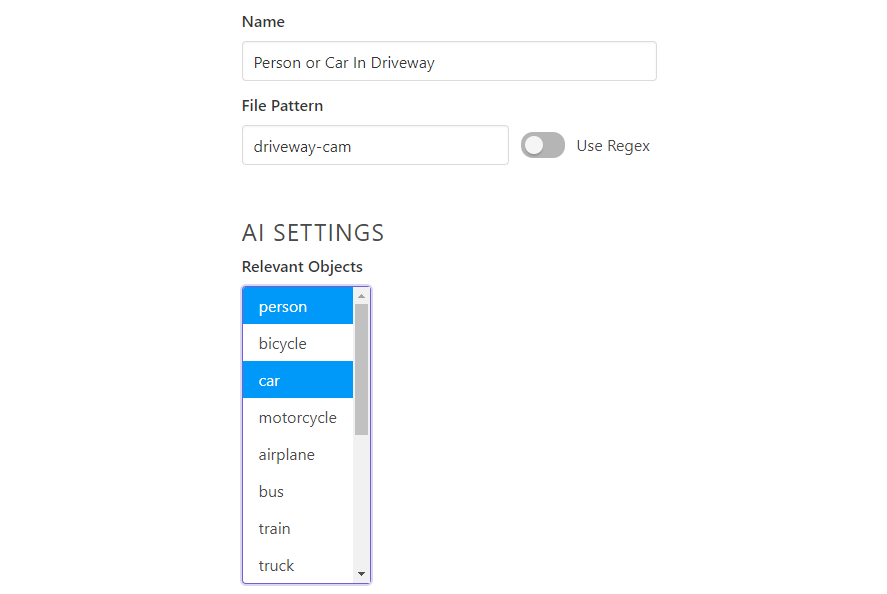
Every profile must have a File Pattern. The File Pattern is a search string for images that come in. If your NVR software generates jpegs like "driveway-cam_20201029123255.jpg", a good search string would be "driveway-cam". You can also use Regex for more advanced pattern matching.
You must also select one or more Relevant Objects for each profile. When an image file is matched to the profile, Last Watch will run the AI and search for those objects.
The rest of the settings are optional ways to further refine the profile:
- Minimum Confidence - how sure the AI must be about what it finds
- Mask File - a bitmap which defines areas for the AI to ignore
- Smart Filtering - ignore objects which remain stationary, such as a car parked in a driveway
2. Detection Events
When new image files come in, Last Watch will create a Detection Event for each image.
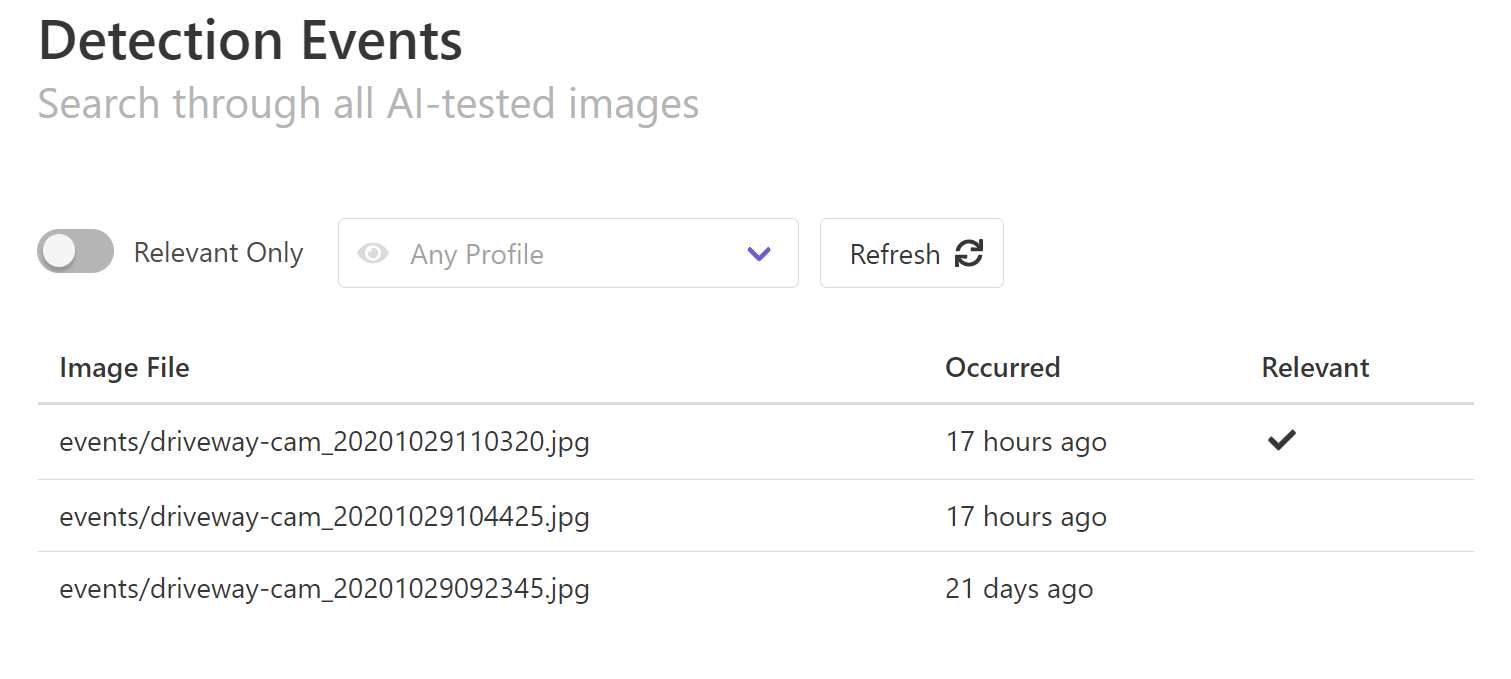
If the image matches one or more of your profiles, then the AI is run to check the image for relevant objects. If the image does contain relevant objects (and they are not masked or filtered out), then the event is marked Relevant and the profile's Automations are triggered.
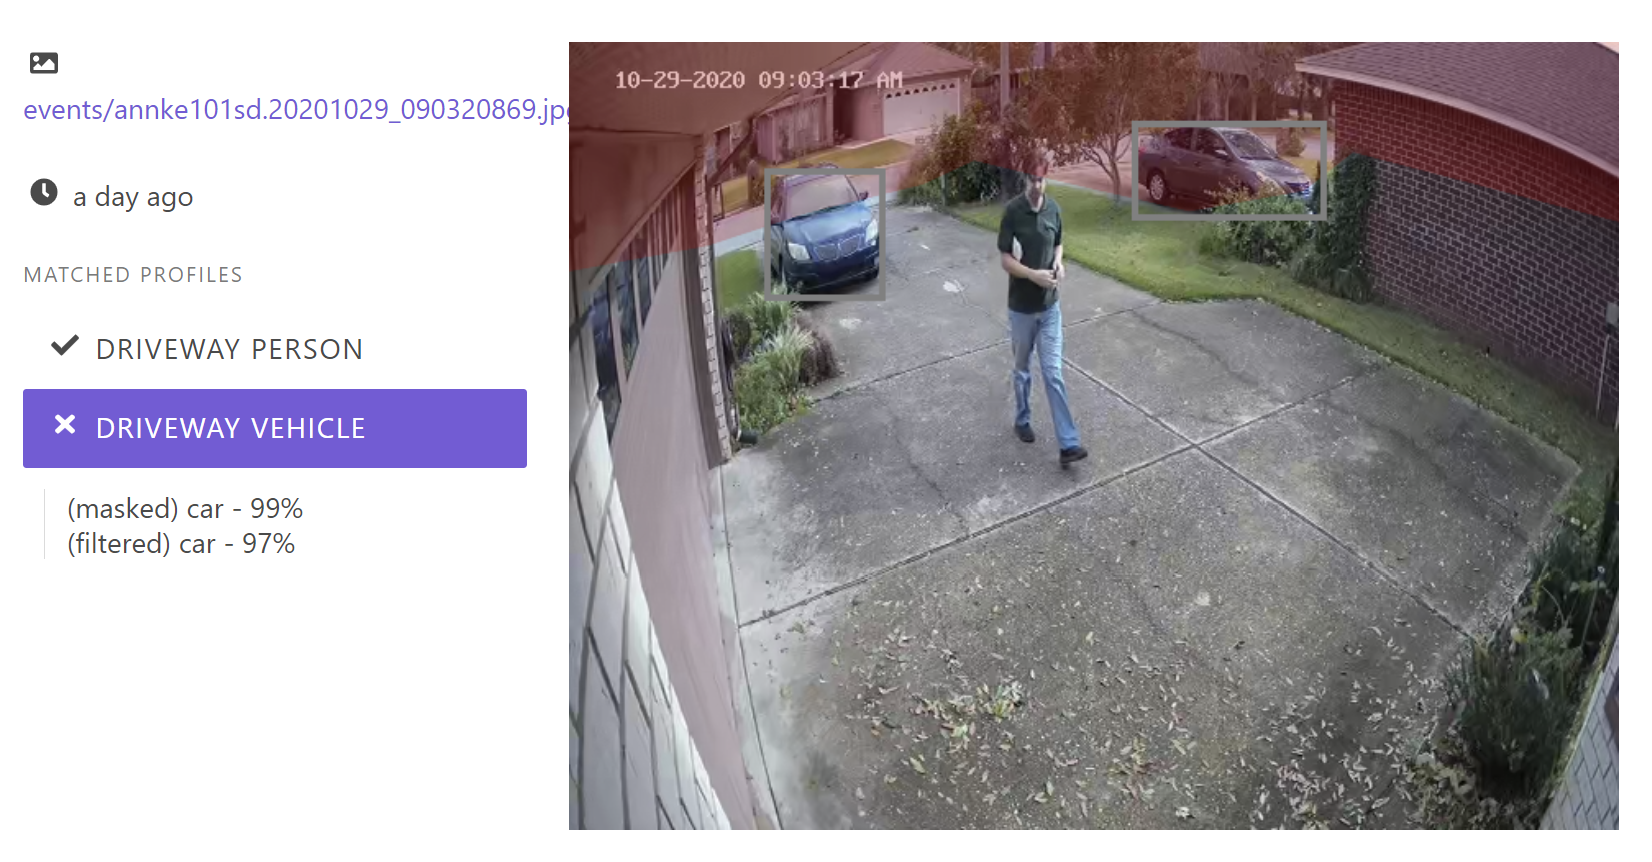
From the Detection Events page, you can click into each event to see more details:
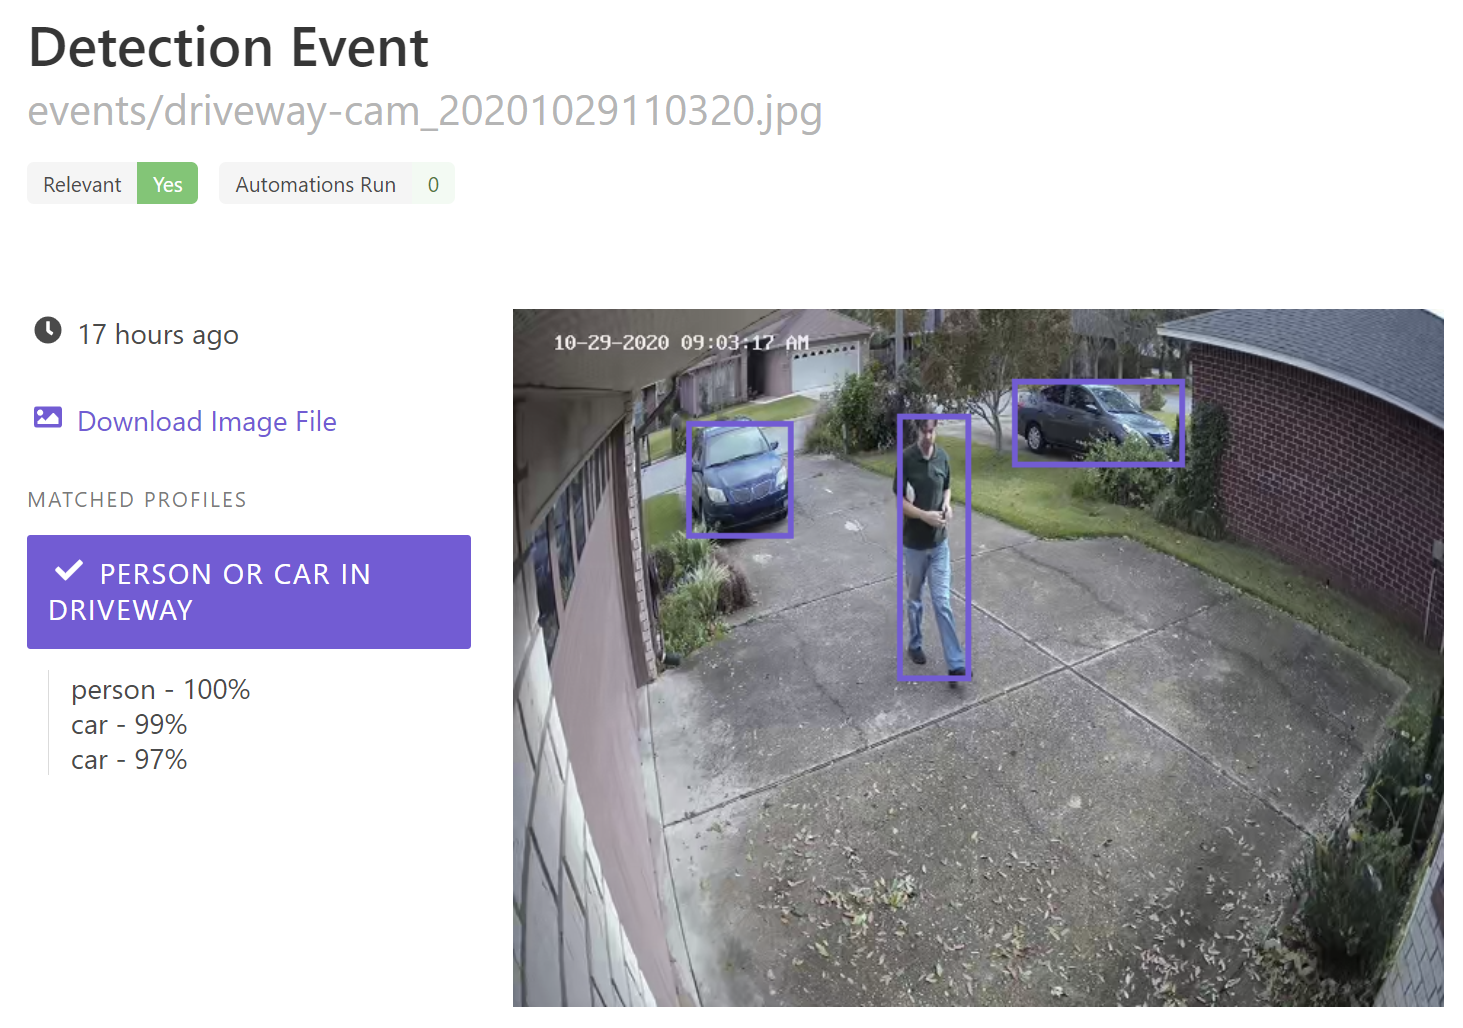
The original image is shown, along with each Detection Profile which was matched and tested for relevance. If you click the profile name you can see the relevant objects with their confidence levels.
You can also see, in this case, that zero Automations were run. That is because none are set up by default.
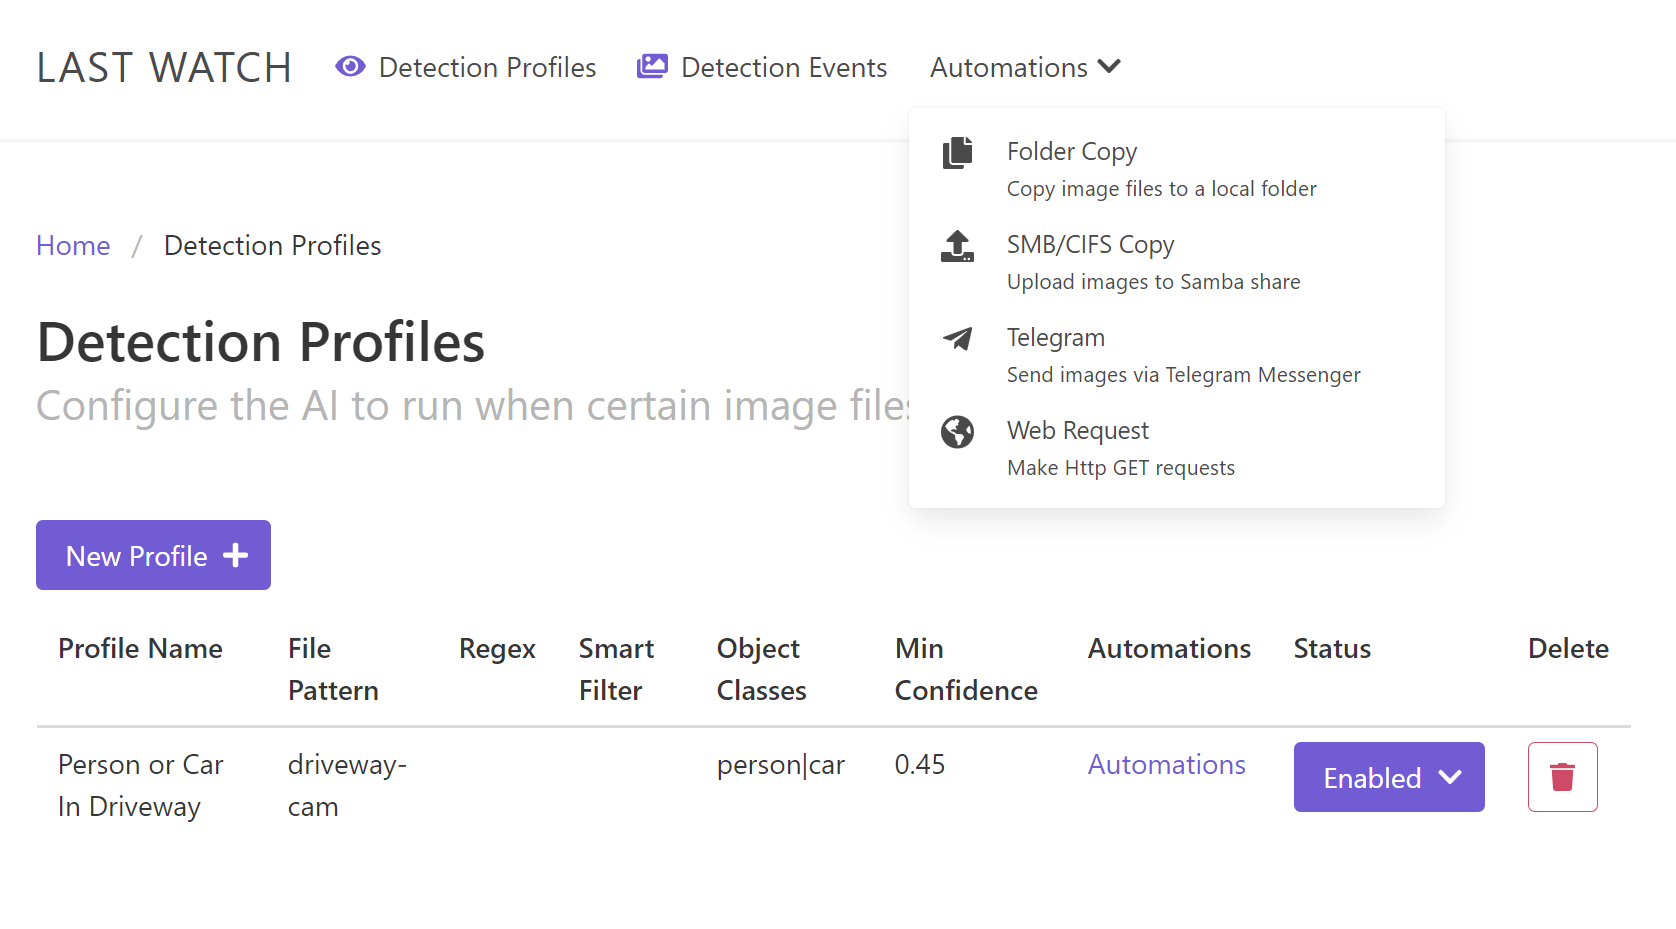
3. Automations
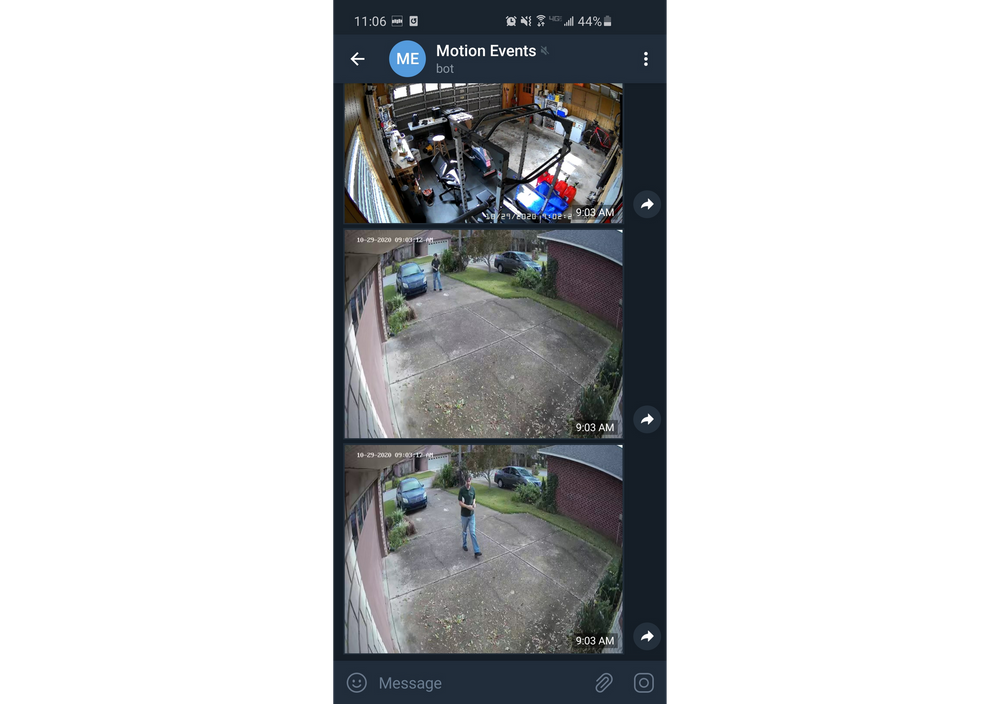
When a relevant event is generated, you typically want to run one or more Automations such as sending the image via Telegram, or making a web request to your home automation system.
Each automation must be defined using the menu options in the navbar:
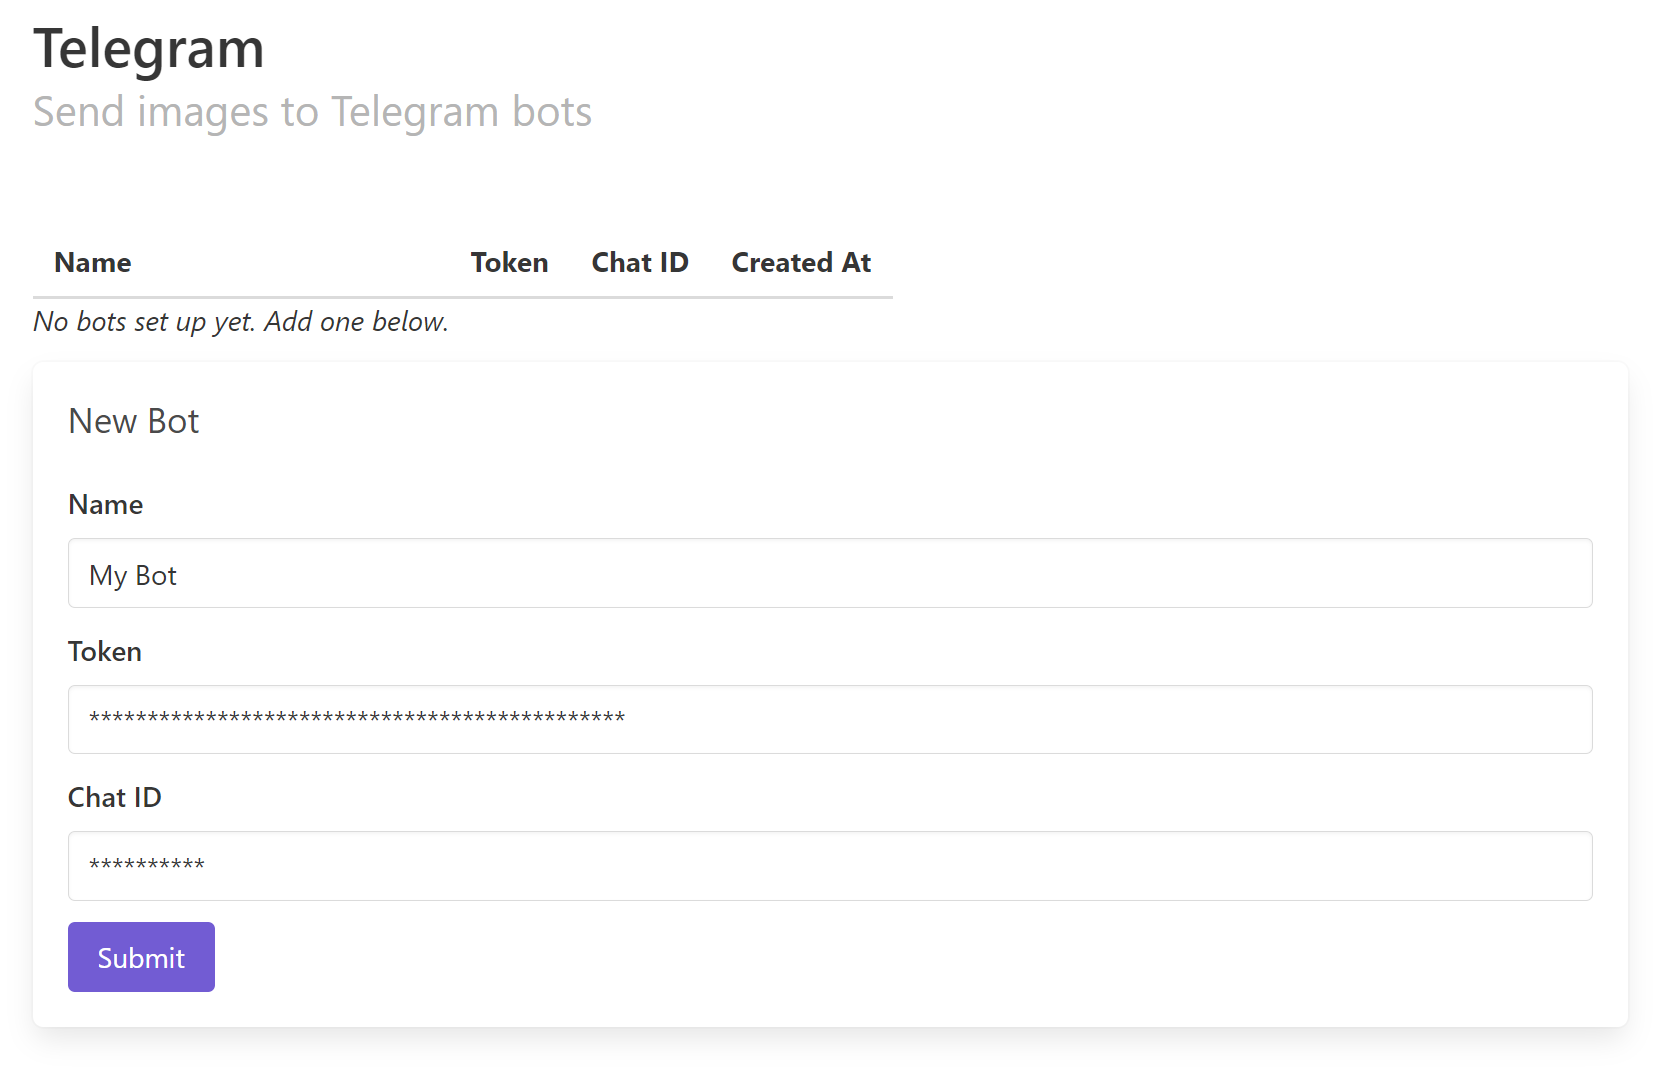
Once you have configured some Automations, they need to be linked to your profile(s). From the Detection Profiles page, you can follow the Automations link for each profile to set up the behavior.
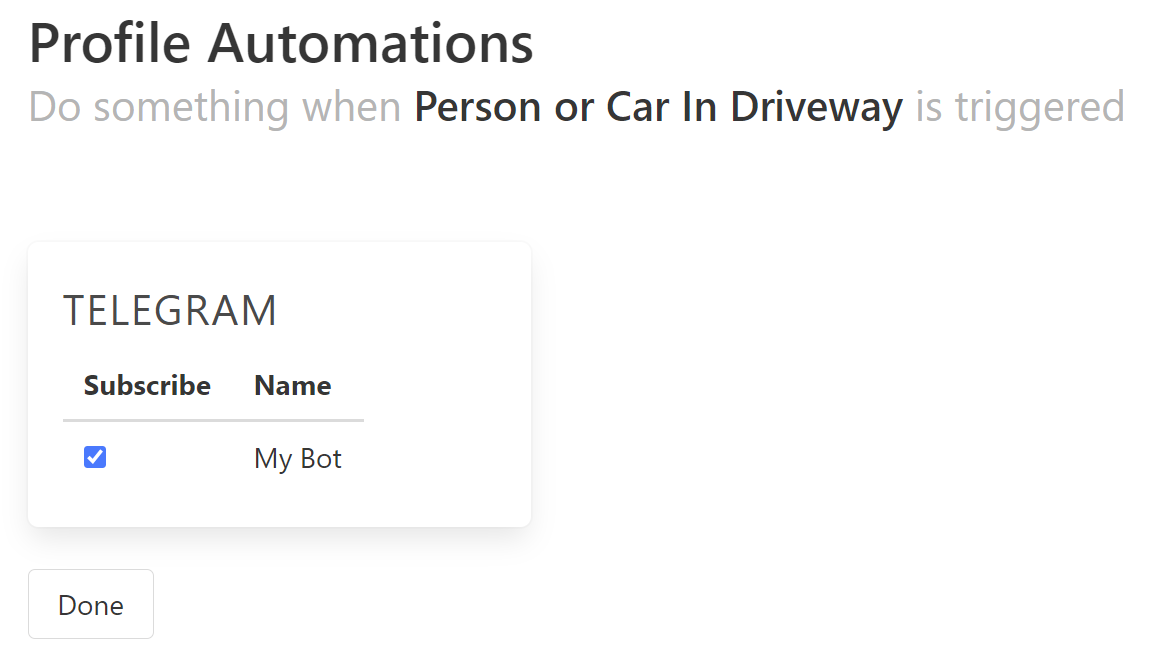
Now the profile is complete and the Automations will begin to trigger when relevant events are generated!
4. Advanced Settings
So far, this guide has demonstrated the most basic functionality available. Here are some more advanced features to further refine your profiles.
Mask Files
You can mask out specific areas for the AI to ignore by creating and uploading a Mask File. The mask file is an image with the same dimensions as the input files, where the "masked out" areas are shaded in. This is useful if you want to mask out areas that you don't care about, like a public street or a neighbor's property.
When the AI detects an object like a car or person, if most of the object is in the masked area, then the object is masked out and not considered for relevance. When you view an event that has a masked profile, you will see the mask rendered out when you click on that profile.
As of release 0.4.0, you have to create the Mask File manually and upload it when creating your profile. This can be done in the photo editor of your choice. Here is a walkthrough using GIMP (coming soon), which is available for free.
Smart Filtering
Another option you have when creating a profile is called Smart Filtering. This option will try to ignore duplicate detection events. For example, maybe you don't want to constantly trigger your automations because a car is sitting stationary in the driveway. The object is relevant, but it's not moving.
Smart Filtering will compare each event to the previous event to see if the relevant objects were already present in the same area. If the same type of object is in the same position through both events, then the object is "filtered" out and not considered for relevance.
The Smart Filtering Precision is a function of how much the two objects must overlap to be filtered out. The default setting is a good baseline but you may need to adjust it if you feel the filtering is too relaxed or too aggressive.
Enabling/Disabling Profiles
You also have the option to Enable and Disable individual profiles, or run them on a schedule. For example, you could have a schedule that looks for people in your driveway during the night, and triggers automations to trip an alarm.
Profiles can also be enabled/disabled using the API. If you already have home automation like Home Assistant or openHAB, you could create your own automations to turn profiles on or off:
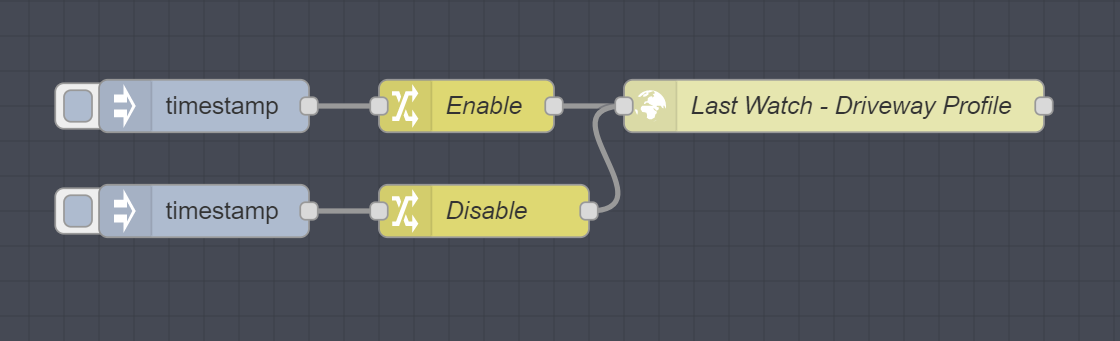
[{"id":"e7c6cfa7.8101f","type":"http request","z":"57c05c38.dd9c14","name":"Last Watch - Driveway Profile","method":"PUT","ret":"txt","paytoqs":"ignore","url":"http://127.0.0.1:8080/api/profiles/1/status","tls":"","persist":false,"proxy":"","authType":"","x":520,"y":160,"wires":[[]]},{"id":"e7ed3def.d6c3d","type":"change","z":"57c05c38.dd9c14","name":"Enable","rules":[{"t":"set","p":"payload","pt":"msg","to":"{\"status\": \"enabled\"}","tot":"json"}],"action":"","property":"","from":"","to":"","reg":false,"x":310,"y":160,"wires":[["e7c6cfa7.8101f"]]},{"id":"586c3090.44936","type":"inject","z":"57c05c38.dd9c14","name":"","props":[{"p":"payload"},{"p":"topic","vt":"str"}],"repeat":"","crontab":"","once":false,"onceDelay":0.1,"topic":"","payload":"","payloadType":"date","x":160,"y":160,"wires":[["e7ed3def.d6c3d"]]},{"id":"f09231a2.74374","type":"change","z":"57c05c38.dd9c14","name":"Disable","rules":[{"t":"set","p":"payload","pt":"msg","to":"{\"status\": \"disabled\"}","tot":"json"}],"action":"","property":"","from":"","to":"","reg":false,"x":320,"y":220,"wires":[["e7c6cfa7.8101f"]]},{"id":"27ec8817.0ac578","type":"inject","z":"57c05c38.dd9c14","name":"","props":[{"p":"payload"},{"p":"topic","vt":"str"}],"repeat":"","crontab":"","once":false,"onceDelay":0.1,"topic":"","payload":"","payloadType":"date","x":160,"y":220,"wires":[["f09231a2.74374"]]}]RESTful API
Note that everything you can do with the web interface can also be done with the API. In fact, the web app is just a skin that sits on top of the API. If you hate the web app, you could create your own interface from scratch or you could manage everything from your home automation system.
As of release 0.4.0, the API is not yet mature and there is no real documentation. For now, you can use the developer console in your web browser to see how the web app is interacting with the API as a guide for making your own calls.
Beware that the API is subject to breaking changes. A release is planned soon which is focused on formally rolling out the API which will likely contain many of these breaking changes.