Proxmox + Home Assistant: Host System Hardware Monitoring


This post will show how I set up CPU Temperature monitoring for Home Assistant running on a virtual machine in Proxmox. Virtualized hardware does not report temperatures, so I used a python script running on the host system to periodically send the CPU temp to Home Assistant.
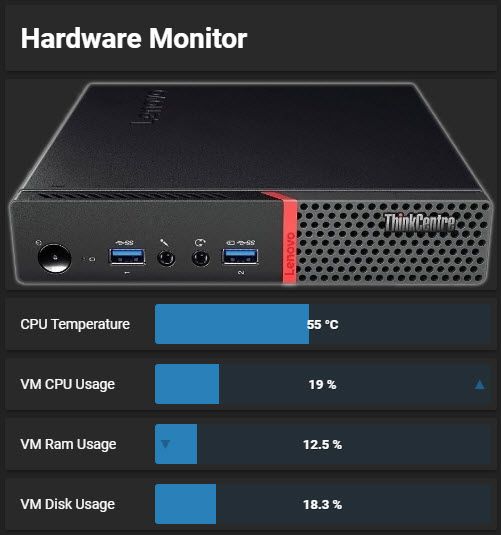
Last week, I finally migrated my Home Assistant setup from my Raspberry Pi onto a Linux server. I decided to set up some monitoring on the new hardware so I can see if resources should be allocated/deallocated from the VM, and so I can send myself alerts if usage or temperature gets too high.
Most of the monitoring is trivial to set up using the SystemMonitor component, but I ran into a wall when I tried to set up the CPU temperature. Most information online assumes you are running HA on dedicated hardware like a Pi or a Debian box, where you can easily look up the CPU temp using a simple shell command:
> cat /sys/class/thermal/thermal_zone*/tempThe problem with running HA in a VM is that the virtualized hardware does not have the concept of temperature. If you run the command above in the virtualized Home Assistant node, you will get an error because the path does not exist. However, if you run the same script in the host system, you will get the expected results. This problem just becomes a matter of sending the results from the host system down to the VM.
What I came up with was a python script that runs as a cron job – every 30 seconds it grabs the CPU temp using the command above, and it updates an entity in Home Assistant using the REST API. The rest of this post is a guide for setting everything up in Proxmox.
Note: MQTT may be preferred over the REST API if you already have MQTT set up.
1. Enable the Rest API
api:2. Set up a new Long-lived Access Token
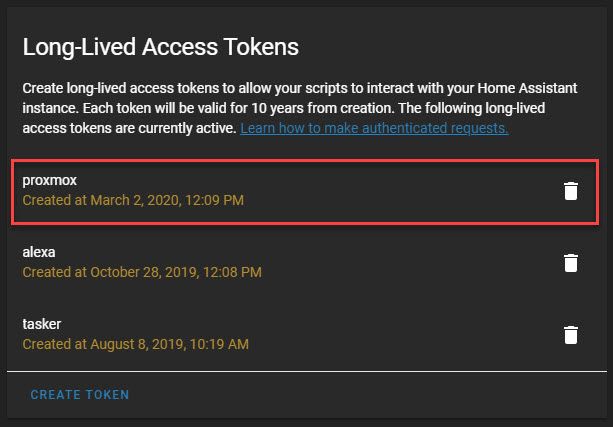
Go to the Profile screen in Home Assistant, scroll to the bottom and create a new Long-lived Access Token. This token will be used by the host system when calling the API, so give it a meaningful name. You will be given a long string of characters, so make sure you copy paste it somewhere to use in the script later.
3. Create entities to monitor the temperature
input_number:
cpu_temp:
name: CPU Temperature
min: 0
max: 200000
sensor:
- platform: template
sensors:
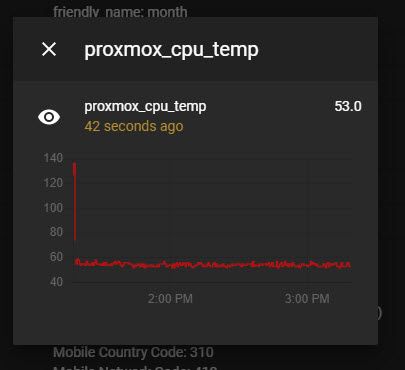
proxmox_cpu_temp:
value_template: '{{ states("input_number.cpu_temp") | multiply(0.001) | round(1) }}'5. Install Python
Root into Proxmox using the web interface or SSH terminal. Run the following commands to install Python.
> apt update
> apt install python-pip3
Verify the install by running the following command:
> pip3 --version6. Locate the CPU temperature file
While you are rooted into Proxmox, run the following command to get a list of all temperature files.
cat /sys/class/thermal/thermal_zone*/typeThis script will return the names of the different available temperatures. In my case, the correct CPU temp is called x86_pkg_temp. This one is 4th in the list, which is 0-based, so my CPU's thermal zone number is 3.
Here is the command to get the temperature once you know the zone number:
cat /sys/class/thermal/thermal_zone3/tempNote that the value returned will be in thousanths of a degree-Celcius, i.e. you need to divide it by 1000 to get the temperature.
7. Add the python script
Use vim or nano to create a new python script using the template below, and make the necessary replacements for your thermal zone, HA hostname/port, and bearer token.
#!/usr/bin/env python3

import subprocess
from requests import post

# Get temperature from system using the command from step 6
temp=subprocess.check_output("cat /sys/class/thermal/thermal_zone3/temp", shell=True)

# Parse temperature value from string
temp = [int(i) for i in temp.split() if i.isdigit()][0]

# Replace hostname and port with your HA instance
# Make sure to use the correct protocol, http or https
url = "http://192.168.1.53:8123/api/states/input_number.cpu_temp"

# Replace ABCDEFG with your Long-lived access token
headers = {
  "Authorization": "Bearer ABCDEFG",
  "content-type": "application/json"
}

data = '{"state": %s}' % temp

response = post(url, headers=headers, data=data, verify=False)
Save the file and use chmod to make it executable, then test the script:
> chmod x+a my_script.py

> ./my_script.py
If it worked, you will see that the value of the input_number.cpu_temp entity has been updated in Home Assistant. If the value did not update correctly, you can troubleshoot by adding print statements to the script to double check the values of the variables.
8. Automate the script
The last step is to automate the script so that it runs periodically. Add a new cron task to run the job every 30 seconds. Edit the crontab with crontab -e and add two lines:
* * * * * /root/my_script.py
* * * * * (sleep 30 ; /root/my_script.py)This is actually done by creating two cron tasks, one that runs every minute, and one that runs every minute but with a 30 second delay (* * * * * means run every minute).
Conclusion
Now we have a way to push system monitoring info from the host system to Home Assistant running in a VM. The CPU temp will continue to update every 30 seconds as long as the host and the VM are both running. I'm interested in seeing what else I can extend this to, if I wanted to monitor anything else on the host system like overall CPU/memory usage, or even stats from other VMs running on the same host.
Thanks for reading!
Update 8/24/2020 - I recently switched to using an nginx reverse proxy to serve up https only when accessed from outside the network, so that my local traffic is all unencrypted. I only caught this problem once I noticed that the CPU temp was no longer updating. I have updated the script to use http and included a note in the comments.