Vue.js Single Page Application with ASP.NET MVC 5
In this post I will share how I set up an ASP.NET MVC 5 project as a SPA using Vue.js.

In this post I will share how I set up an ASP.NET MVC 5 project as a SPA using Vue.js. I will walk through each step of constructing this template so you can see what each piece does and how you may need to modify it for your tastes. I will also include some tips on how to set up your environment for rapid development.
 akmolina28
The completed template is available now on Github. If you're already comfortable with npm and webpack, feel free to jump straight to the source code.
Key Features:
- Responsive design using Bulma (or the framework of your choice via npm).
- True SPA with client-side routing.
- Dependency injection using Ninject.
- Hot module reloading for rapid development (browser is automatically refreshed when you change a file).
- Browser-sync for testing in multiple browsers or viewports at once.
- Bundling, minification, cache-busting, and source-maps for all static files.
- MSBuild events to run the webpack build when building the MVC project or publishing the project manually or via CI/CD
- ESLint integration for Vue and JS files.
Model-Vue-Controller
The basic idea is to have the MVC application function as a headless API for your basic CRUD operations. Then, instead of using Razor and jQuery for the View layer, we will use Vue. The routing is also handled on the client-side using Vue Router to create a true single-page application.
Strip Down
The first thing I did after creating a new MVC 5 application in VS2019 was to start stripping out all of the default client-side tooling.
- Uninstall nuget packages: bootstrap, Microsoft.jQuery.Unobtrusive.Validation, jQuery.Validation, and jQuery.
- Remove folders ~/Content, ~/fonts, and ~/Scripts
- Remove BundleConfig.cs (bundling will be handled by webpack)
- Remove entire Views folder (razor views will be replaced by Vue components)
This clears the way to begin pulling dependencies in via npm and setting up our SPA.
SPA Routing
Next, we need to set up our default route. Instead of the traditional routes for controller actions, we will create one catch-all route to return our single page. Start by removing the HomeController, and adding a new controller called SpaController.
public class SpaController : Controller
{
    public ActionResult Index()
    {
    	return File("~/dist/index.html", "text/html");
    }
}The SpaController has a single action which returns index.html, which will be our single page.
Finally we just need to update the routes so that all routes go to our new SPA action. Remove the default route and map a new route like this:
public class RouteConfig
{
    public static void RegisterRoutes(RouteCollection routes)
    {
        routes.IgnoreRoute("{resource}.axd/{*pathInfo}");

        routes.MapRoute(
            name: "SPA",
            url: "{*catchall}",
            defaults: new { controller = "Spa", action = "Index" }
        );
    }
}Hello Vue
Now that the project has been stripped down, we can start fresh with npm. Our first goal is to get a simple hello world working with Vue.
Source Code
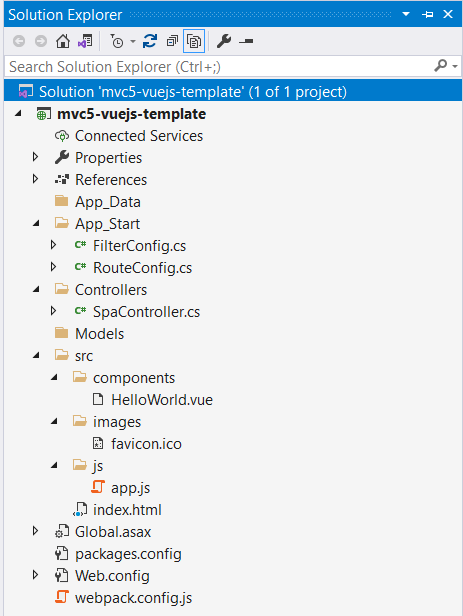
All of our client-side source code will go into a new folder called src. Let's start by adding three files there:
1. Create ~/src/index.html. This is the "single page" which is served up for our SPA. Vue will hook into the div in the body.
<!DOCTYPE html>
<html>
<head>
    <meta charset="utf-8" />
    <title>MVC 5 Vue.js Template</title>
</head>
<body>
  <div id="app">
    <hello-world></hello-world>
  </div>
</body>
</html>2. Create ~/src/components/HelloWorld.vue. This is a simple Vue component with basic reactivity.
<template>
  <div>
    <h1>{{ message }}</h1>
    <input v-model="message" type="text" />
  </div>
</template>

<script>
export default {
  data() {
    return {
      message: 'Hello from Vue!'
    };
  },
};
</script>3. Create ~/src/js/app.js. This is the entry-point for the application which initializes the HelloWorld component into our div in index.html.
import Vue from 'vue';

import HelloWorld from "../components/HelloWorld";

new Vue({
  el: '#app',
  components: {
    HelloWorld
  }
});
Build Configuration
Next, we have to set up webpack to build the assets above into something that our web browser can understand. First we need to initialize our npm project and pull in our dependencies.
$ npm init
$ npm i -s vue vue-template-compiler
$ npm i -D webpack webpack-cli
$ npm i -D vue-loader css-loader postcss
$ npm i -D html-webpack-plugin- vue and vue-template-compiler are provided by Vue.js for processing Vue files
- webpack and webpack-cli are used to set up our build process
- vue-loader, css-loader, and postcss are to help webpack make sense of our source code
- html-webpack-plugin is to inject the script tags into index.html. This is important because the script tags due to cache busting.
The final step is to add the file ~/webpack.config.js. If you are not familiar with webpack, this is the most overwhelming part of this setup. Here is a boilerplate config to start with, but note that this might need to be tweaked for your specific environment and/or package versions.
const HtmlWebpackPlugin = require('html-webpack-plugin');
const { VueLoaderPlugin } = require('vue-loader');
const path = require('path');

module.exports = {
  mode: 'development',
  devtool: 'eval',
  entry: [
    './src/js/app.js',
  ],
  output: {
    clean: true,
    path: path.resolve(__dirname, 'dist'),
    publicPath: '/dist',
    filename: '[name].bundle.[contenthash].js',
  },
  resolve: {
    // point bundler to the vue template compiler
    alias: {
      'vue$': 'vue/dist/vue.esm.js',
    },
    // allow imports to omit file exensions,
    // e.g. "import foo from 'foobar'" instead of "import foo from 'foobar.js'"
    extensions: ['.js', '.vue'],
  },
  module: {
    rules: [
      // use vue-loader plugin for .vue files
      {
        test: /\.vue$/,
        use: 'vue-loader'
      },
    ],
  },
  plugins: [
    new VueLoaderPlugin(),
    new HtmlWebpackPlugin({
      template: 'src/index.html',
      inject: true,
      // favicon: 'src/images/favicon.ico',
      publicPath: '/dist'
    }),
  ],
};
Now we can execute our build by running wepback:
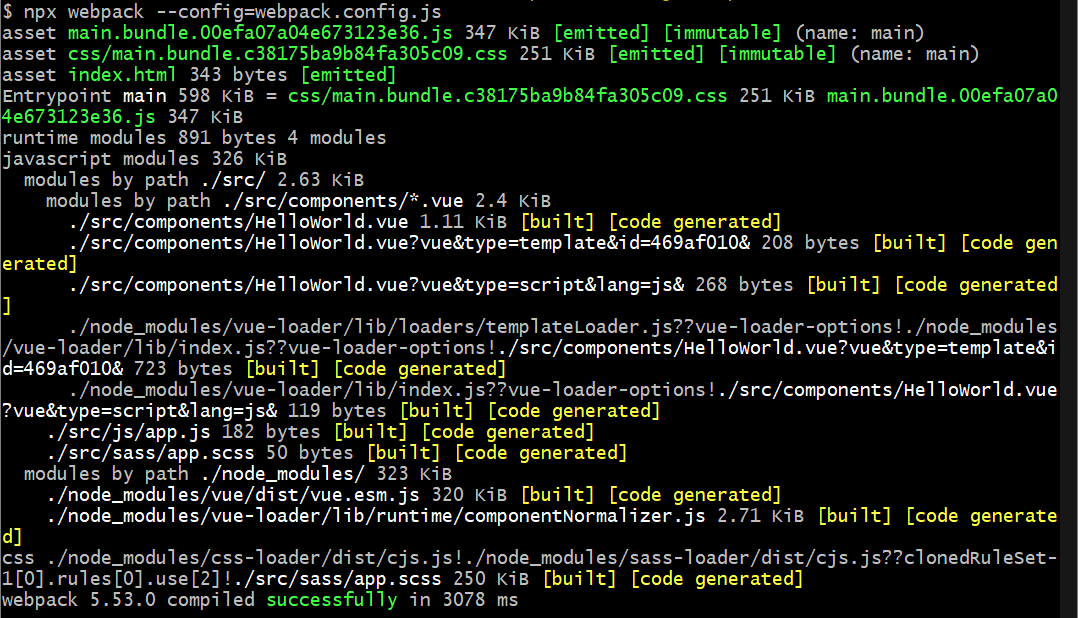
$ npx webpack --config=webpack.config.js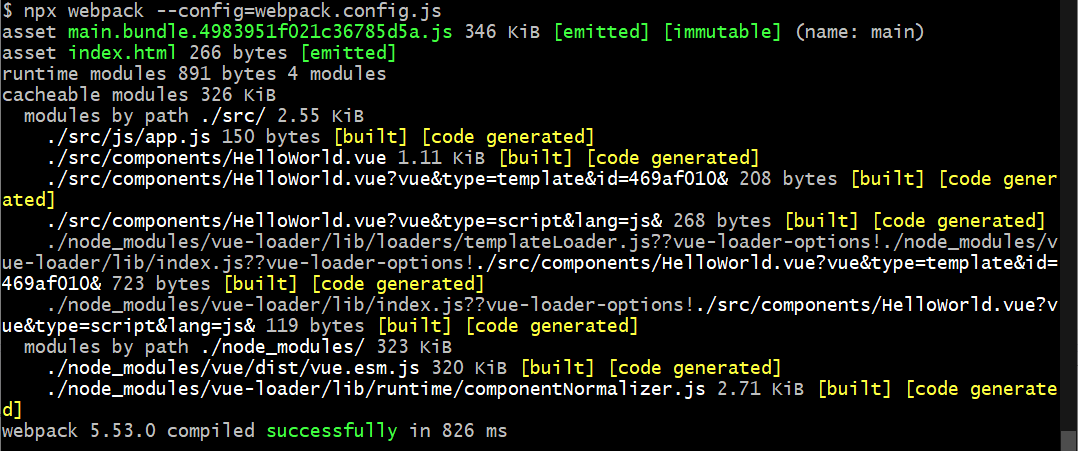
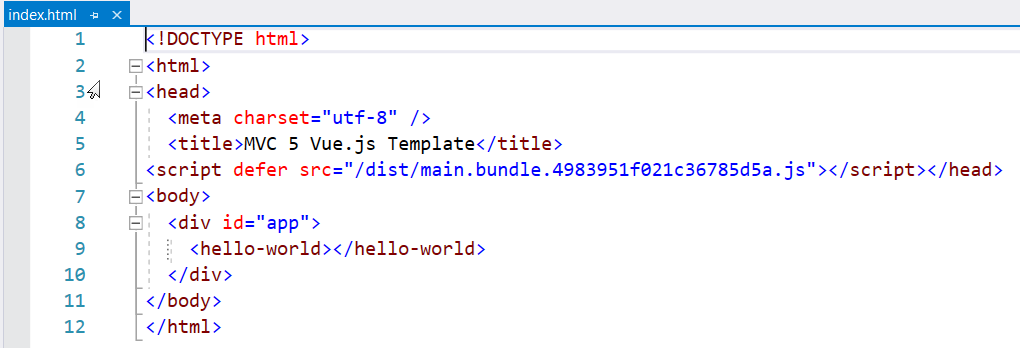
The build emits two files into the output folder, the script bundle and the modified index.html file. If you open ~/dist/index.html you will see that webpack has inject the script tags.
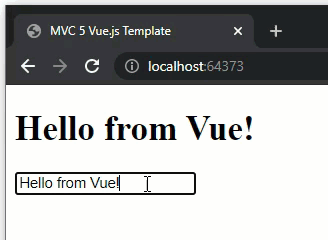
Finally, if we run the debugger in Visual Studio, we should see the working hello world demo.
Styles and Layout
Now we have Vue and webpack working, but our app looks pretty ugly. Let's add some style by installing a CSS framework and setting up a layout. For this demo I will use Bulma, but at this point you could something else like Bootstrap or Tailwind.
Refer to the latest Bulma documentation for complete setup. This guide may be outdated.
Bulma + Webpack Setup
$ npm i -D bulma
$ npm i -D extract-text-webpack-plugin@next mini-css-extract-plugin node-sass sass-loader style-loader
$ npm i -s @fortawesome/fontawesome-svg-core @fortawesome/free-solid-svg-icons @fortawesome/vue-fontawesome@latest- bulma – responsive CSS framework
- extract-text-webpack-plugin, mini-css-extract-plugin, node-sass, sass-loader, style-loader – webpack plugin for bundling the styles
- fortawesome packages – free icon pack
Now we can hook up the styles by adding our application's main sass file, ~/src/sass/app.scss:
@charset "utf-8";
@import "~bulma/bulma";
And we can import app.scss and the icon pack into our bundle.
Remember, app.js is the only defined entry point in our webpack configuration. We either need to import the styles into app.js, or add the styles as a separate entry point.
import Vue from 'vue';

// load all solid icons
// modify here to load individual icons as needed to reduce bundle size
import { fas } from '@fortawesome/free-solid-svg-icons';
import { library } from '@fortawesome/fontawesome-svg-core';
import { FontAwesomeIcon } from '@fortawesome/vue-fontawesome';
library.add(fas);

import HelloWorld from "../components/HelloWorld";
import Layout from "../components/Layout";

// pull in main stylesheet
require('../sass/app.scss');

new Vue({
  el: '#app',
  components: {
    HelloWorld,
    Layout
  }
});The final setup is to update our webpack config with some new rules for our styles. I am using the optional mini-css-extract-plugin to extract the styles into a separate file with its own content-hash.
const HtmlWebpackPlugin = require('html-webpack-plugin');
const { VueLoaderPlugin } = require('vue-loader');
const path = require('path');
const MiniCssExtractPlugin = require('mini-css-extract-plugin');

module.exports = {
  mode: 'development',
  devtool: 'eval',
  entry: [
    './src/js/app.js',
  ],
  output: {
    clean: true,
    path: path.resolve(__dirname, 'dist'),
    publicPath: '/dist',
    filename: '[name].bundle.[contenthash].js',
  },
  resolve: {
    // point bundler to the vue template compiler
    alias: {
      'vue$': 'vue/dist/vue.esm.js',
    },
    // allow imports to omit file exensions,
    // e.g. "import foo from 'foobar'" instead of "import foo from 'foobar.js'"
    extensions: ['.js', '.vue'],
  },
  module: {
    rules: [
      // use vue-loader plugin for .vue files
      {
        test: /\.vue$/,
        use: 'vue-loader'
      },
      // rule for loading .scss files
      {
        test: /\.scss$/,
        use: [
          MiniCssExtractPlugin.loader,
          {
            loader: 'css-loader',
          },
          {
            loader: 'sass-loader',
            options: {
              sourceMap: true,
            },
          },
        ],
      }
    ],
  },
  plugins: [
    new VueLoaderPlugin(),
    new MiniCssExtractPlugin({
      filename: 'css/[name].bundle.[contenthash].css',
    }),
    new HtmlWebpackPlugin({
      template: 'src/index.html',
      inject: true,
      //favicon: 'src/images/favicon.ico',
      publicPath: '/dist'
    }),
  ],
};
After these changes, running the build should emit a third file, css/main.bundle.[hash].css:
Responsive Layout
Now that Bulma is set up, we can begin using the framework by adding a layout to wrap our content. Here is a boilerplate layout file, very similar to the example provided in the Bulma documentation. Add this code to ~/src/components/Layout.vue:
<template>
  <div class="container">
    <nav class="navbar" role="navigation" aria-label="main navigation">
      <div class="navbar-brand">
        <a class="navbar-item" href="/">
          <h4 class="heading is-size-4">Mvc5 + Vue.js</h4>
        </a>

        <a role="button"
           :class="`navbar-burger ${menuActive ? 'is-active' : ''}`"
           aria-label="menu"
           aria-expanded="false"
           data-target="navbarBasicExample"
           @click="menuActive = !menuActive">
          <span aria-hidden="true"></span>
          <span aria-hidden="true"></span>
          <span aria-hidden="true"></span>
        </a>
      </div>

      <div id="navbarBasicExample"
           :class="`navbar-menu ${menuActive ? 'is-active' : ''}`">
        <div class="navbar-start">
          <a class="navbar-item">
            Home
          </a>

          <a class="navbar-item">
            <span class="icon has-text-primary">
              <icon icon="book"></icon>
            </span>
            <span>Documentation</span>
          </a>

          <a class="navbar-item">
            <span class="icon has-text-info">
              <icon icon="info-circle"></icon>
            </span>
            <span>About</span>
          </a>
        </div>

        <div class="navbar-end">
          <div class="navbar-item">
            <div class="buttons">
              <a class="button is-primary">
                <strong>Sign up</strong>
              </a>
              <a class="button is-light">
                Log in
              </a>
            </div>
          </div>
        </div>
      </div>
    </nav>
    <main>
      <slot></slot>
    </main>
  </div>
</template>

<script>
  export default {
    data() {
      return {
        menuActive: false,
      };
    },
  };
</script>

<style lang="scss" scoped>
@import "~bulma/sass/utilities/mixins";

@media screen and (min-width: $widescreen) {
  .navbar {
    font-size: 1.125rem;
    padding: 2rem 0;
  }
}

@media screen and (min-width: $desktop) {
  .navbar {
    padding: 1rem 0;
  }
}

.navbar-item > .icon {
  margin-left: -0.25rem;
  margin-right: 0.25rem;
}
</style>
And then we just need to update app.js and index.js to use the Layout:
import Vue from 'vue';

import HelloWorld from "../components/HelloWorld";
import Layout from "../components/Layout";

require('../sass/app.scss');

new Vue({
  el: '#app',
  components: {
    HelloWorld,
    Layout
  }
});<!DOCTYPE html>
<html>
<head>
<meta charset="utf-8" />
<title>MVC 5 Vue.js Template</title>
</head>
<body>
<div id="app">
<layout>
<hello-world></hello-world>
</layout>
</div>
</body>
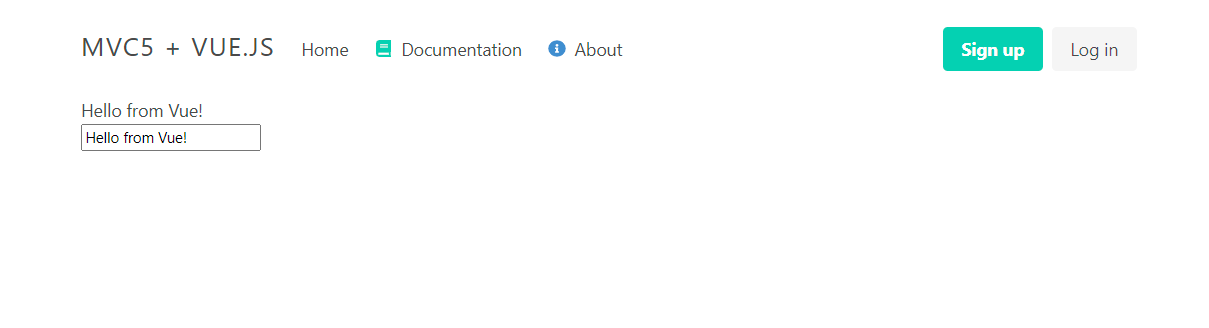
</html>Now if we rebuild the bundle and run the VS debugger, we should see our hello world component styled and rendered in our new layout component.
Routing and API Setup
Now we have almost everything we need to start building out our SPA. At this point, index.html is hard coded to serve up our layout and our hello-world component. We need to change this so that it instead serves up dynamic content depending on which route the user has requested.
But before I set up the routing, I will set up some models and controller actions so that our routes actually have something useful to serve up.
API Backend
Let's create a simple data model and a data context for storing and reading data. Then we can add our API actions and routing.
1. Add the data model under ~/Models/MovieModel.cs
namespace mvc5_vuejs_template.Models
{
    public class MovieModel
    {
        public int Id { get; set; }

        public string Title { get; set; }

        public int Year { get; set; }

        public string Director { get; set; }

        public string Studio { get; set; }
    }
}2. Add the data context under ~/Services/MovieService.cs
namespace mvc5_vuejs_template.Services
{
    public class MovieService
    {
        private static List<MovieModel> _movieContext = new List<MovieModel>()
        {
            new MovieModel()
            {
                Id = 1,
                Title = "Jurrasic Park",
                Director = "Steven Spielberg",
                Year = 1993,
                Studio = "Universal Pictures"
            },
            new MovieModel()
            {
                Id = 2,
                Title = "Alien",
                Director = "Ridley Scott",
                Year = 1979,
                Studio = "20th Century Fox"
            },
            new MovieModel()
            {
                Id = 3,
                Title = "Titanic",
                Director = "James Cameron",
                Year = 1997,
                Studio = "Paramount Pictures"
            }
        };

        public IEnumerable<MovieModel> GetMovies()
        {
            return _movieContext;
        }

        public int InsertMovie(MovieModel model)
        {
            int id = _movieContext.Last().Id + 1;

            model.Id = id;
            _movieContext.Add(model);
            return id;
        }
    }
}3. Add the actions to ~/Controllers/MovieController.cs
namespace mvc5_vuejs_template.Controllers
{
    public class MovieController : Controller
    {
        private MovieService _movieService;

        public MovieController()
        {
            _movieService = new MovieService();
        }

        public JsonResult Index()
        {
            var movies = _movieService.GetMovies();
            return Json(movies.ToArray(), JsonRequestBehavior.AllowGet);
        }

        [HttpPost]
        public JsonResult Create(MovieModel movie)
        {
            var insertedMovie = _movieService.InsertMovie(movie);
            return Json(insertedMovie);
        }
    }
}4. Add the API routes under ~/App_Start/RouteConfig.cs
namespace mvc5_vuejs_template
{
    public class RouteConfig
    {
        public static void RegisterRoutes(RouteCollection routes)
        {
            routes.IgnoreRoute("{resource}.axd/{*pathInfo}");

            routes.MapRoute(
                name: "API",
                url: "api/{controller}/{action}/{id}",
                defaults: new { id = UrlParameter.Optional }
            );

            routes.MapRoute(
                name: "SPA",
                url: "{*catchall}",
                defaults: new { controller = "Spa", action = "Index" }
            );
        }
    }
}Now our CRUD actions are accessible using api routes. The main difference between an API action and a traditional MVC action is that our API actions only return JSON data, whereas MVC actions typically return Razor views.
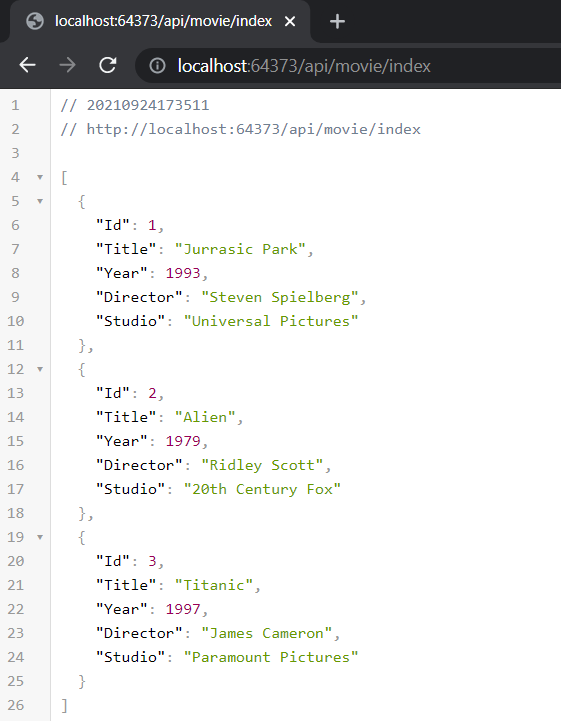
We can test the API by running the debugger and navigating to /api/movie/index to hit the Index action. We should get raw JSON back.
Movie Views and Vue Router
Next, add some Vue components to display and add new Movies. Then we can set up client-side routing using Vue Router so we can navigate between the "pages" of our SPA.
1. Pull in the axios library for making requests to the API.
$ npm i -s axios2. Add the list-view component under ~/src/components/Movies/Index.vue. This component will get the list of movies and render it in a table.
<template>
  <section>
    <div class="mb-5">
      <h1 class="title">Movies</h1>
    </div>
    <div>
      <a class="button is-link mb-2" @click="$router.push('movies/create')">
        <icon icon="plus" class="mr-2"></icon>
        <span>Add Movie</span>
      </a>
    </div>
    <icon v-if="loading" icon="spinner" spin></icon>
    <table v-else class="table is-striped">
      <thead>
        <tr>
          <th>Id</th>
          <th>Title</th>
          <th>Year</th>
          <th>Director</th>
          <th>Studio</th>
        </tr>
      </thead>
      <tbody>
        <tr v-for="movie in movies" :key="movie.id">
          <td>{{ movie.Id }}</td>
          <td>{{ movie.Title }}</td>
          <td>{{ movie.Year }}</td>
          <td>{{ movie.Director }}</td>
          <td>{{ movie.Studio }}</td>
        </tr>
      </tbody>
    </table>
  </section>
</template>

<script>
  import axios from 'axios';

  export default {
    name: 'MovieIndex',
    data() {
      return {
        loading: false,
        movies: [],
      };
    },
    mounted() {
      this.getMovies();
    },
    methods: {
      getMovies() {
        this.loading = true;
        axios.get('/api/movie/index')
          .then((data) => {
            this.movies = data.data;
          })
          .catch((error) => {
            // eslint-disable-next-line no-console
            console.log('Error caught when getting movies from the api:');
            // eslint-disable-next-line no-console
            console.log(error);
          })
          .then(() => {
            this.loading = false;
          });
      },
    },
  };
</script>3. Add the create view under ~/src/Components/Movie/Create.vue. This component has a form to create new movies.
<template>
  <div>
    <div class="mb-5">
      <h1 class="title">Create Movie</h1>
    </div>
    <div class="columns">
      <div class="column is-half">
        <form @submit.prevent="submitForm">
          <div class="field">
            <label class="label">Title</label>
            <div class="control">
              <input v-model="title" class="input" type="text" />
            </div>
          </div>
          <div class="field">
            <label class="label">Year</label>
            <div class="control">
              <input v-model="year" class="input" type="text" />
            </div>
          </div>
          <div class="field">
            <label class="label">Director</label>
            <div class="control">
              <input v-model="director" class="input" type="text" />
            </div>
          </div>
          <div class="field">
            <label class="label">Studio</label>
            <div class="control">
              <input v-model="studio" class="input" type="text" />
            </div>
          </div>
          <div class="field is-grouped">
            <div class="control">
              <button class="button is-link">Submit</button>
            </div>
            <div class="control">
              <a class="button is-link is-light"
                 @click="$router.push('/movies')">
                Cancel
              </a>
            </div>
          </div>
        </form>
      </div>
    </div>
  </div>
</template>

<script>
  import axios from 'axios';

  export default {
    data() {
      return {
        title: '',
        year: '',
        director: '',
        studio: '',
      };
    },
    methods: {
      submitForm() {
        axios
          .post('/api/movie/create', {
            Title: this.title,
            Year: this.year,
            Director: this.director,
            Studio: this.studio,
          })
          .then(() => {
            this.$router.push('/movies');
          })
          .catch((error) => {
            // eslint-disable-next-line no-console
            console.log('Error caught when getting movies from the api:');
            // eslint-disable-next-line no-console
            console.log(error);
          });
      },
    },
  };
</script>Now we have our views, but we need a way to navigate them in our SPA.
4. Pull in Vue Router from npm.
$ npm i -S vue-router5. Add the routing to ~/src/js/router.js. This is where we will set up all of our client-side routing.
import VueRouter from 'vue-router';
import HelloWorld from '../components/HelloWorld';
import MovieIndex from '../components/Movie/Index';
import MovieCreate from '../components/Movie/Create';

const routes = [
  {
    path: '/',
    name: 'default',
    component: HelloWorld,
  },
  {
    path: '/movies',
    name: 'movie_index',
    component: MovieIndex,
  },
  {
    path: '/movies/create',
    name: 'movie_create',
    component: MovieCreate,
  },
];

export default new VueRouter({
  mode: 'history',
  routes,
  linkActiveClass: 'is-active', // apply bulma class when a router link is active
});
6. Import Vue Router and the custom routes to the entry point ~/src/js/app.js. We can also remove the code that imports the HelloWorld component, because that is handled by the router now.
import Vue from 'vue';

import VueRouter from 'vue-router';
import router from './router';
Vue.use(VueRouter);

// load ALL solid icons
// modify here to load individual icons as needed to reduce bundle size
import { fas } from '@fortawesome/free-solid-svg-icons';
import { library } from '@fortawesome/fontawesome-svg-core';
import { FontAwesomeIcon } from '@fortawesome/vue-fontawesome';
library.add(fas);
Vue.component('icon', FontAwesomeIcon);

import Layout from "../components/Layout";

require('../sass/app.scss');

new Vue({
  el: '#app',
  router,
  components: {
    Layout
  }
});7. Finally, we need to update ~/src/index.html to render the component returned by our router. We just have to replace the hard-coded hello-world component with the built-in router-view component:
<!DOCTYPE html>
<html>
<head>
  <meta charset="utf-8" />
  <title>MVC 5 Vue.js Template</title>
</head>
<body>
  <div id="app">
    <layout>
      <router-view></router-view>
    </layout>
  </div>
</body>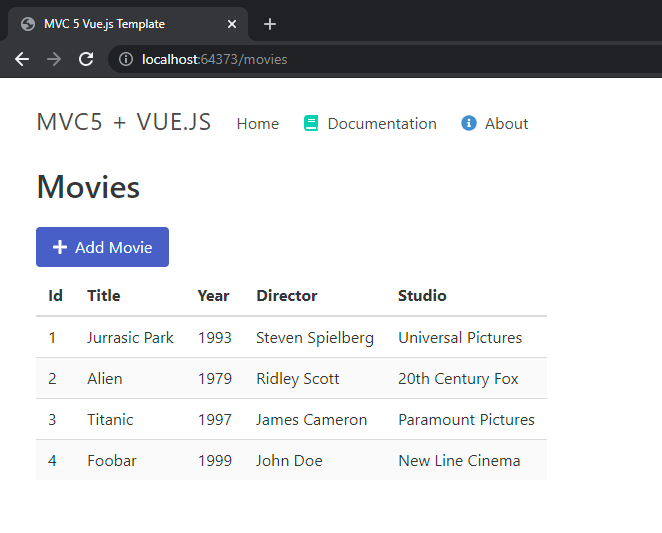
</html>Re-run the webpack build and start the visual studio debugger, then navigate to the /movies route. You should see the list of movies and you should be able to add more to the list.
Router Links and Transitions
Vue Router also provides a convenient way to generate links to your routes using the router-link component. We will use this component now to wire up our navigation links. We can also wrap our content in a <transition> to create a smoother feel when navigating between different routes.
<template>
  <div class="container">
    <nav class="navbar" role="navigation" aria-label="main navigation">
      <div class="navbar-brand">
        <a class="navbar-item" href="/">
          <h4 class="heading is-size-4">Mvc5 + Vue.js</h4>
        </a>

        <a role="button"
           :class="`navbar-burger ${menuActive ? 'is-active' : ''}`"
           aria-label="menu"
           aria-expanded="false"
           data-target="navbarBasicExample"
           @click="menuActive = !menuActive">
          <span aria-hidden="true"></span>
          <span aria-hidden="true"></span>
          <span aria-hidden="true"></span>
        </a>
      </div>

      <div id="navbarBasicExample"
           :class="`navbar-menu ${menuActive ? 'is-active' : ''}`">
        <div class="navbar-start">
          <router-link to="/" class="navbar-item">
            Home
          </router-link>

          <router-link to="/movies" class="navbar-item">
            <span class="icon has-text-primary">
              <icon icon="film"></icon>
            </span>
            <span>Movies</span>
          </router-link>

          <a class="navbar-item">
            <span class="icon has-text-info">
              <icon icon="info-circle"></icon>
            </span>
            <span>About</span>
          </a>
        </div>

        <div class="navbar-end">
          <div class="navbar-item">
            <div class="buttons">
              <a class="button is-primary">
                <strong>Sign up</strong>
              </a>
              <a class="button is-light">
                Log in
              </a>
            </div>
          </div>
        </div>
      </div>
    </nav>
    <main>
      <transition name="fade" mode="out-in">
        <slot></slot>
      </transition>
    </main>
  </div>
</template>

<script>
  export default {
    data() {
      return {
        menuActive: false,
      };
    },
  };
</script>

<style lang="scss" scoped>
@import "~bulma/sass/utilities/mixins";

@media screen and (min-width: $widescreen) {
  .navbar {
    font-size: 1.125rem;
    padding: 2rem 0;
  }
}

@media screen and (min-width: $desktop) {
  .navbar {
    padding: 1rem 0;
  }
}

.navbar-item > .icon {
  margin-left: -0.25rem;
  margin-right: 0.25rem;
}

.fade-enter-active, .fade-leave-active {
  transition: opacity .25s
}

.fade-enter, .fade-leave-to {
  opacity: 0
}
</style>
Run the build again and try clicking the Home and Movies links in the navigation. The views should fade out/in smoothly as you navigate back and forth. You can tweak the fade effect by updating the included sass rules.
Integrated Build for Dev and Prod
Now we have a fully working SPA. The MVC application exposes a CRUD API, and all of the View code and routing is handled in Vue. The last thing we have to do is integrate the webpack build into our MSBuild process. This will ensure that our webpack bundles are built whenever...
- A new developer checks out and builds the solution
- You manually publish the web project to a folder
- You deploy using your CI/CD process
Dev and Prod Builds
First, let's split our webpack build into two separate configurations. This will allow us to do conditional things like minification and source mapping depending on the environment.
1. Add a new webpack config for prod, ~/webpack.prod.js. This config will contain overrides for our production build.
const baseConfig = require('./webpack.config.js');
const { merge } = require("webpack-merge");

module.exports = merge(baseConfig, {
	mode: 'production',
	devtool: false,
});
2. Add helper scripts to package.json so we have cleaner build commands.
{
  // package.json...
  // ...

  "scripts": {
    "dev": "webpack --config=webpack.config.js",
    "prod": "webpack --config=webpack.prod.js"
  }
}3. Now, test out the different builds using the new custom commands:
$ npm run dev
$ npm run prod
Look at the output in the dist folder to see the differences between the two builds. The prod build should exclude source-maps, and the generated bundles will be much smaller in size. See the webpack documentation for more on how webpack optimizes production bundles.
MSBuild Integration
Now we can set up our project to automatically run the webpack build corresponding to the selected Build Configuration.
1. In Visual Studio, right-click the Project and unload it.
2. Double-click the project to edit the .csproj file.
3. Add the following code at the end of the figit
<PropertyGroup>
  <CompileDependsOn>
    $(CompileDependsOn);
    WebpackBuild;
  </CompileDependsOn>
  <CopyAllFilesIntoSingleFolderForPackageDependsOn>
    $(CopyAllFilesIntoSingleFolderForPackageDependsOn);
    CollectWebpackOutput;
  </CopyAllFilesIntoSingleFolderForPackageDependsOn>
  <CopyAllFilesToSingleFolderFolderForMsDeployDependsOn>
    $(CopyAllFilesToSingleFolderFolderForMsDeployDependsOn);
    CollectWebpackOutput;
  </CopyAllFilesToSingleFolderFolderForMsDeployDependsOn>
</PropertyGroup>
<Target Name="WebpackBuild">
  <Message Condition="'$(Configuration)' != 'UnitTest'" Text="Running npm install" Importance="high" />
  <Exec Condition="'$(Configuration)' != 'UnitTest'" Command="npm install" WorkingDirectory="$(ProjectDir)" />
  <Message Condition="'$(Configuration)' == 'Debug'" Text="Running webpack build (development)" Importance="high" />
  <Exec Condition="'$(Configuration)' == 'Debug'" Command="npm run dev" WorkingDirectory="$(ProjectDir)" />
  <Message Condition="'$(Configuration)' == 'Release'" Text="Running webpack build (production)" Importance="high" />
  <Exec Condition="'$(Configuration)' == 'Release'" Command="npm run prod" WorkingDirectory="$(ProjectDir)" />
</Target>
<Target Name="CollectWebpackOutput" BeforeTargets="CopyAllFilesToSingleFolderForPackage;CopyAllFilesToSingleFolderForMsdeploy">
  <Message Text="Adding gulp-generated files" Importance="high" />
  <ItemGroup>
    <CustomFilesToInclude Include=".\dist\**\*.*" />
    <FilesForPackagingFromProject Include="%(CustomFilesToInclude.Identity)">
      <DestinationRelativePath>.\dist\%(RecursiveDir)%(Filename)%(Extension)</DestinationRelativePath>
    </FilesForPackagingFromProject>
  </ItemGroup>
</Target>Overview of what this does:
- Creates a new build target called WebpackBuild. Building the project depends on the success of WebpackBuild.
- Defines the target WebpackBuild which runs
npm installandnpm run devornpm run proddepending on your build configuration. - Includes all files in the
~/distoutput folder in the published output.
When you Build the project in Visual Studio now, you should see the webpack build in the Build Output:
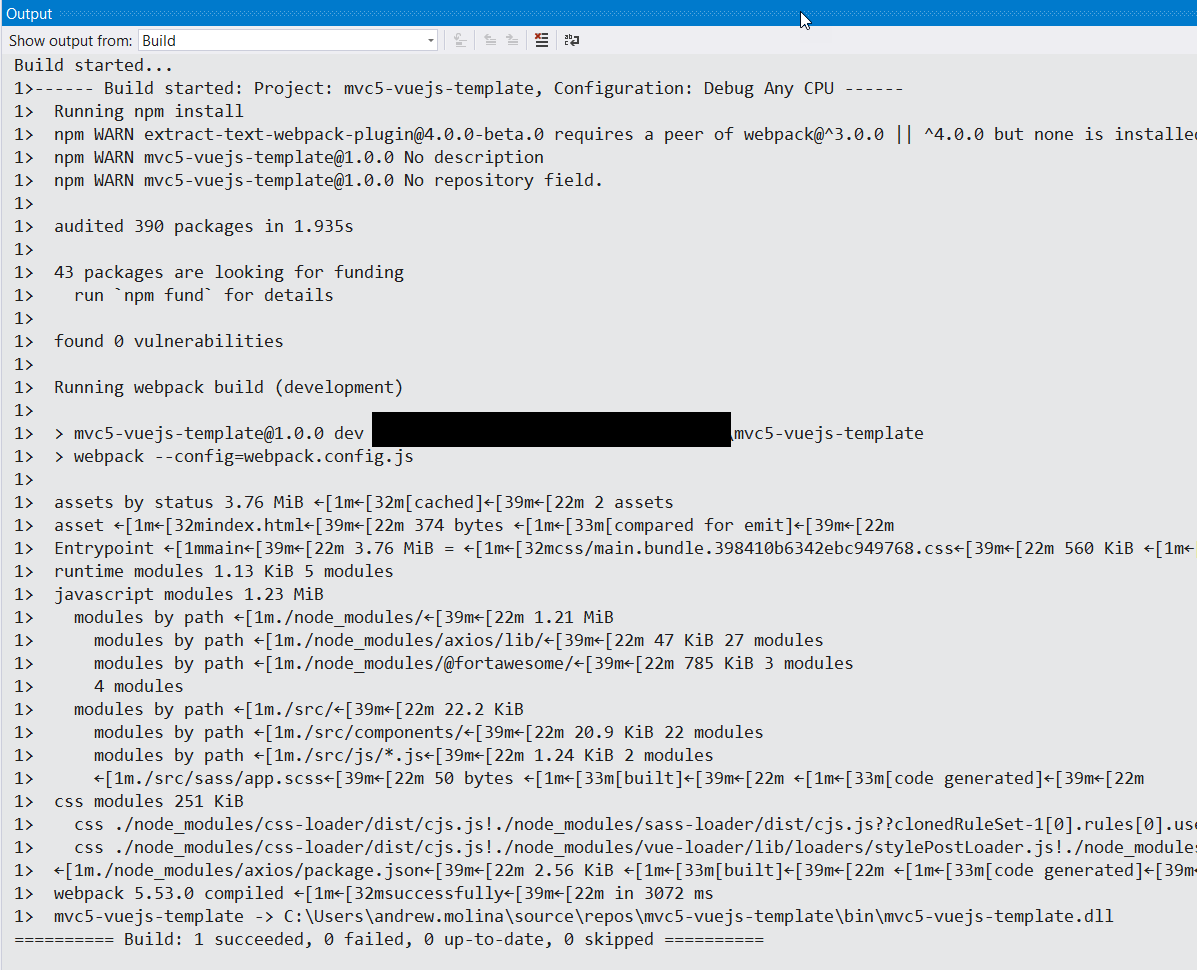
Note that if the webpack build fails, then the entire build will fail and Visual Studio will show the errors in the build output. This is really important for other developers who may not realize that project depends on this extra build process. It will force them to install node.js and run webpack in order to build and debug the project.
The code sample above also has a custom condition for a build configuration called Unit Test. This gives you a way to skip the entire npm/build process to save time when you are running tests.
Setting up your environment for rapid development
The SPA is completely set up now and ready for development. In the previous sections, I demonstrated how you would build out this application by setting up new models, controller actions, views (Vue components), and client-side routing. But before starting development, you should consider also setting up some tools and plugins to make this process even easier.
In the rest of this post I will summarize how I set up my own dev environment to quickly and efficient turn out clean, working Vue code.
Visual Studio Code
There is bad news and good news if you are looking to write Vue code for .NET web applications. The bad news is, as of the time I'm writing this post, Visual Studio has not really embraced Vue.js. That may change under .NET Core, but you're mostly on your own when it comes to Vue.js tooling, especially with MVC 5 projects.
The good news is that Visual Studio Code has amazing support for Vue.js. I actually recommend using VS Code in parallel with Visual Studio. You can edit and debug your ASP.NET code in VS, and you can use VS Code for all of the front-end work. If you haven't tried VS Code yet, this guide will be a great introduction for you – go ahead and install the latest version and continue on.

Git Bash Integration
My first recommendation after you install VS Code is to set up Git Bash as the default terminal. As shown throughout this post, you will be using the terminal a lot, and in my opinion Git Bash is the best option on vanilla Windows unless you are a PowerShell expert.
- Install Git for Windows which includes Git Bash. You most likely already have this, but here is the link in case you do not.
- Open VS Code, and hit Ctrl+Shift+P then run the command
Terminal: Select Default Profile. - Choose Git Bash from the list of options
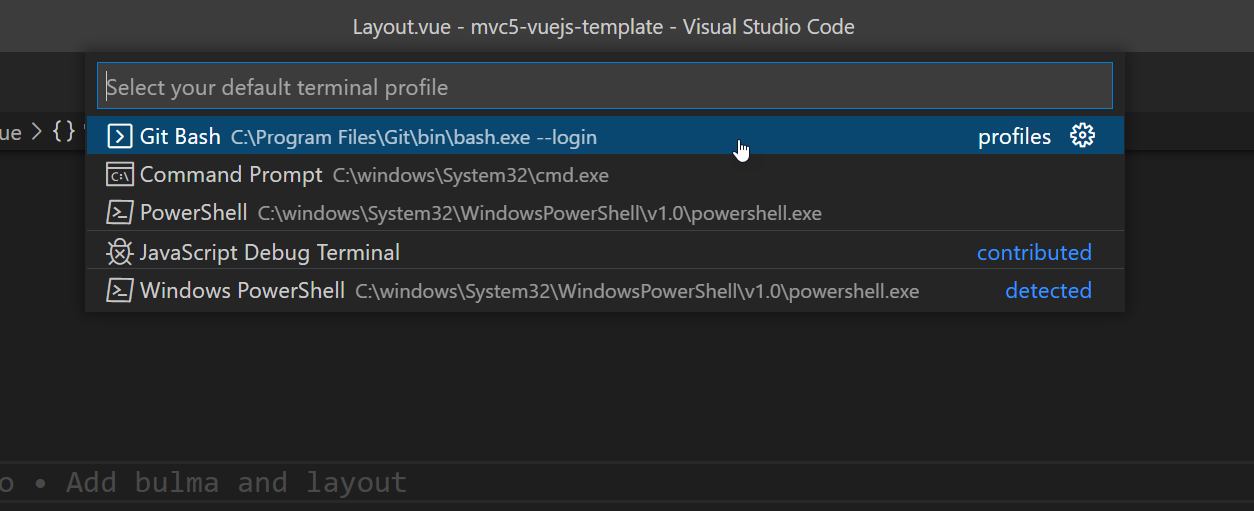
Now you can open the terminal (Ctrl+`) and you should get a new Git Bash terminal. Try out some basic commands like ls -la, or try running your build with npm run dev.
Vetur Extension
The first extension you will want to grab is Vetur, the official extension for Vue.js tooling. Vetur will allow you to do things like lint and auto-format your Vue code, and it adds Intellisense and snippets to save you from having to constantly look at documentation.
- Download and enable the Extension in VS Code
- Add a jsconfig file to the project:
{
"include": [
"./src/**/*"
]
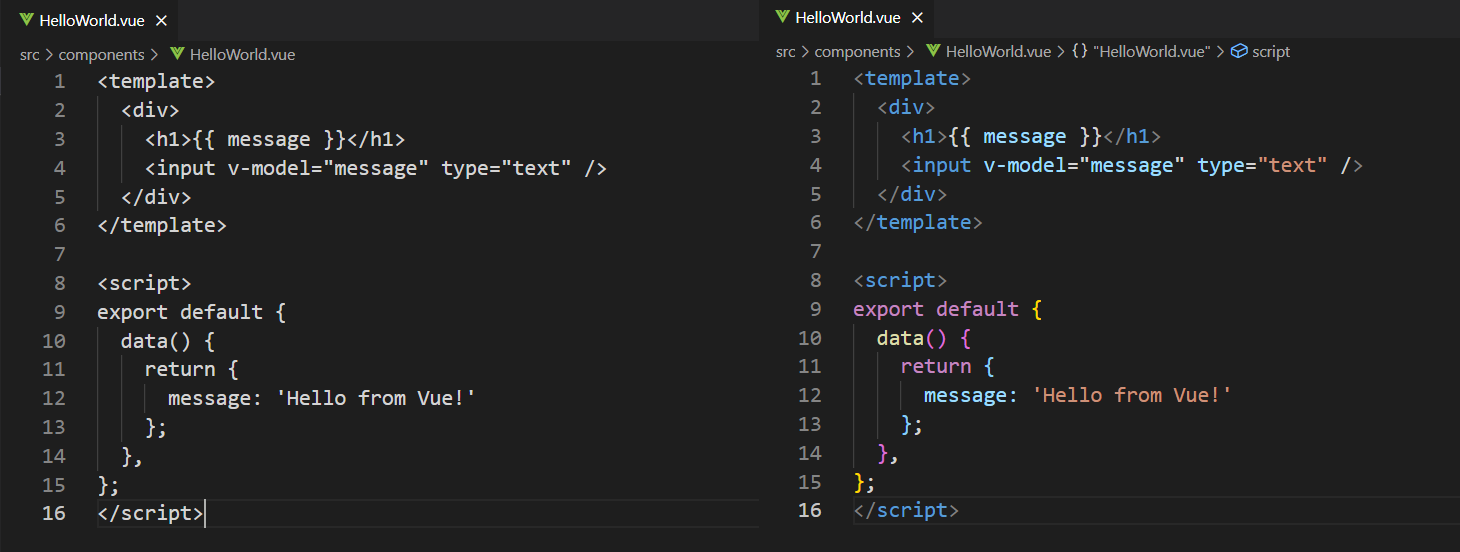
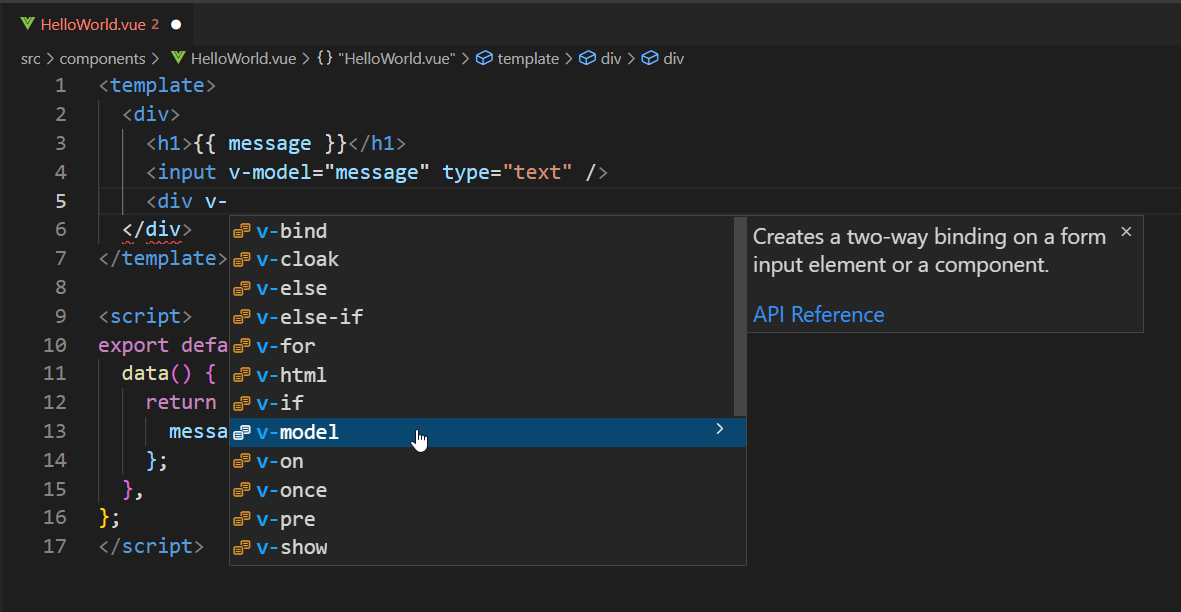
}3. Restart VS Code and open a Vue file. You should have syntax highlighting and intellisense right away. See examples below.
Vue VSCode Snippets
Next, you should grab Vue VSCode Snippets, which will save you a lot of time by scaffolding common structures with just a few keystrokes. Check out the Extension details for some snippets you can try.
Other Helpful Extensions
Some other Extensions that I can't live without include:
- Auto Close Tag – automatically add HTML close tags just like Visual Studio
- Auto Rename Tag – automatically rename HTML close tags just like Visual Studio
- Bracket Pair Colorizer – colorize matching open/close brackets
- GitLens – visualize code authorship inline in the editor
- npm Intellisense – autocomplete import statements
- Vue.js devtools - first-party chrome extension for debugging Vue components
ESLint for Vue
If you work on a team or plan on publishing your code, you should really consider setting up a linter for enforcing code styles and checking syntax.
Here, I'll show you how you can integrate ESLint into your build process so that the build fails if the code does not pass lint. I will also demonstrate how ESLint integrates into VS Code by highlighting errors, and how you can auto-correct common syntax issues. Using ESLint in this way will dramatically improve your code quality without getting in your way too much. Over time it will actually make you a better Vue coder.
1. Install ESLint dependencies
$ npm i -D eslint eslint-webpack-plugin2. Generate your ESLint config
$ ./node_modules/.bin/eslint --initFor the prompts the follow, choose:
- To check syntax, find problems, and enforce code style
- JavaScript modules
- Vue.js
- Typescript: no
- Browser
- Use a popular style guide
- Airbnb (or whichever you prefer)
- JSON
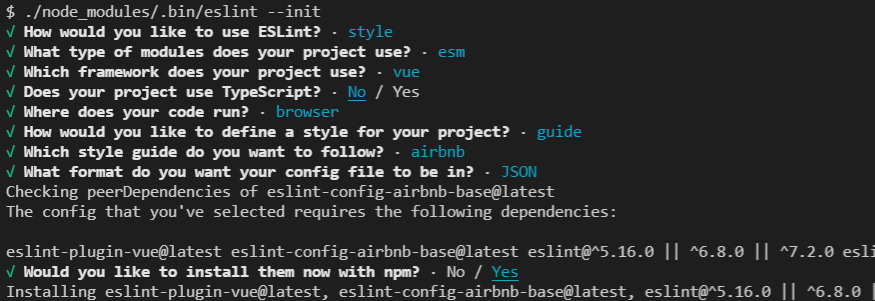
The final prompt will ask you to install extra dependencies. This may or may not work due to permissions issues on Windows file systems. If the install errors out, just install the dependencies manually.
$ npm i -D eslint-plugin-vue@latest eslint-config-airbnb-base@latest eslint-plugin-import@^2.22.13. Run the linter
$ npx eslint ./src/**/*.*You should get a bunch of errors referencing lines of code in the src folder. Do not worry about fixing these yet, we will do that later with the help of VS Code and Vetur.

4. Add a helper script to package.json so that you can run the linter with npm run lint
{
  // package.json
  // ...
  "scripts": {
    "lint": "eslint ./src/**/*.*",
    // ...
  }
}5. Update .eslintrc.json to suit your tastes. I recommend starting with the following:
{
  "env": {
    "browser": true,
    "es2021": true
  },
  "extends": [
    "plugin:vue/base",
    "airbnb-base"
  ],
  "parserOptions": {
    "ecmaVersion": 12,
    "sourceType": "module"
  },
  "plugins": [
    "vue"
  ],
  "rules": {
    "linebreak-style": [
      "warn",
      "windows"
    ]
  }
}I have overridden one rule to allow Windows linebreak styles. Otherwise you will have to manually change to LF every time you edit a file in VS or VS Code. You can add/modify different rules here as needed.
6. Install the ESLint Extension in VSCode.
7. In VS Code, open your Vue and JS files to start fixing issues. When you open a file, you should get a list of issues in the Problems window, with in-line highlighting provided by Vetur. Vetur also allows you to quickly resolve these issues.
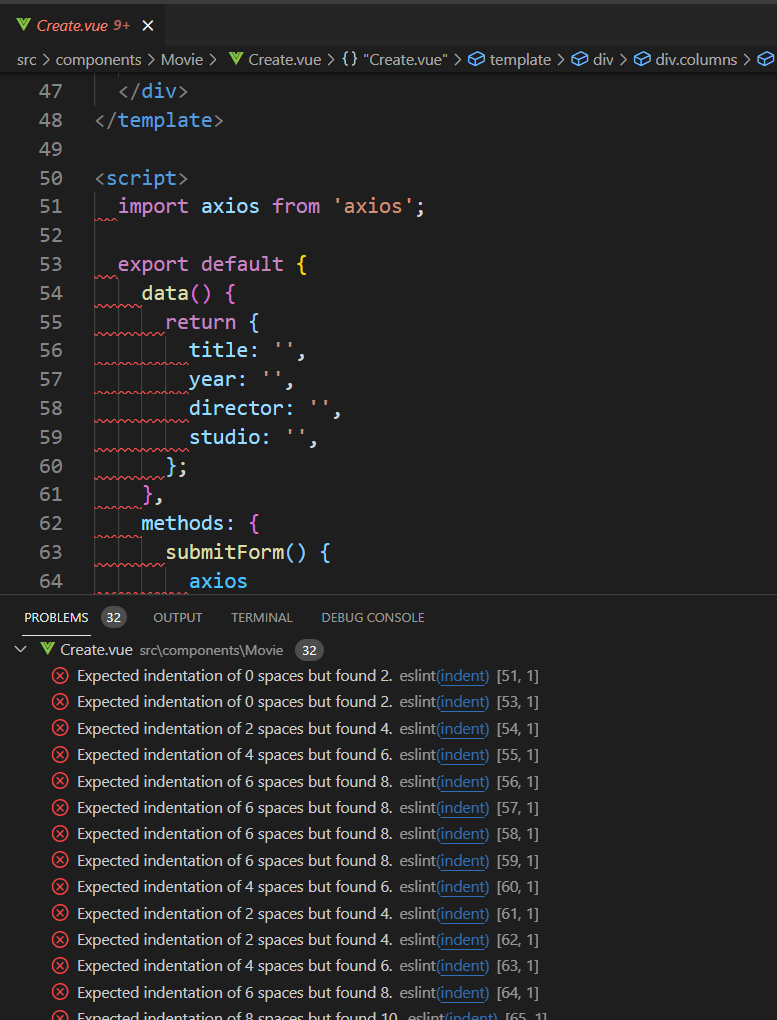
Here are just some of the ways you can resolve your lint errors:
- Hover over the red squiggles, choose Quick Fix for a menu of options.
- Move your cursor to the issue and hit Alt+Shift+. to auto-fix the issue.
- Disable the rule globally in .eslintrc.json.
- Use in-line or for the whole file, or for a specific block or line of code.
- My personal favorite: Hit Ctrl+Shift+P and run the command
ESLint: Fix all auto-fixable Problems
Using the code accumulated so far in this guide, I was actually able to autofix almost every problem. If you are following along, go ahead and fix all of your issues and run npm run lint until you get no errors back.
8. Update your webpack config to run and depend on ESLint.
const ESLintWebpackPlugin = require('eslint-webpack-plugin');

module.exports = {
  // ...
  plugins: [
    // ...
    new ESLintWebpackPlugin({
      failOnError: false,
    }),
  ],
};Now when you run your build, ESLint will automatically check all of your source code and it will emit errors into the build output. You can enable failOnError to block the build if you have lint issues – it is nice to do this for prod builds but can be annoying for dev. failOnError is really important because it will prevent un-linted builds from going out, regardless of who is building the code. ESLint will be run as part of the MSBuild process, so even your CI/CD will error out if the linter fails.
File Watching
There is one more thing we can do to speed up development. A common annoyance with bundlers like webpack is that you have to run the build every time you make changes because your browser cannot directly execute the source code. Large bundles can easily take 10-20 seconds to run, and only then can you refresh the page and re-test. This delay is a significant cognitive burden and can really interrupt your flow as you are making changes.
The quickest fix for this problem is to use the watch flag when running webpack.
{
  // package.json
  // ...
  "scripts": {
    // ...
    "watch": "webpack --config=webpack.config.js --watch"
  }
}
$ npm run watchWhen you run using watch, the build runs once and then the process stays open instead of returning. If you touch a file while the process is open, webpack will rapidly re-bundle your code. It is practically instantaneous, so really all you need to do is save the file and refresh your browser.
Webpack Dev Server and Hot Module Reloading
But what if you didn't even need to refresh your browser? We can take the watcher a step farther by using the Webpack DevServer to host our website.
Webpack DevServer is a node-based web server which can be used to automatically open your browser and reload your modules when you make changes to the code. The dev server runs the build and the watcher, and serves up the bundled output from memory. A common mistake is thinking that the dev server is using the files in your /dist folder, but it actually never touches those files. In fact, you will even see a message in the output like, Content not from webpack is served from 'C:\Users\username\source\repos\mvc5-vuejs-template\public' directory.
1. Install Webpack DevServer
$ npm i -D webpack-dev-server2. Add devServer options to the webpack config
module.exports = {
  // ...
  devServer: {
    historyApiFallback: {
      index: '/dist/index.html',
    },
    proxy: [
      {
        context: '/api/**',
        target: 'http://localhost:64373', // use port from IISExpress
      },
    ],
    open: true
  },
};The configuration above is where the special sauce is. We are telling the dev server to route all requests to /dist/index.html, which is the same exact routing we set up in the MVC project. Next, we are proxying our API routes to use the IIS Express Url. This way, we can get data from our MVC API by running the debugger in the background.
Note that you will have to update the IISExpress port to match the one used by your project.
3. Add a new script to package.json to run the dev server.
{
  // package.json
  // ...
  "scripts": {
    "hot": "webpack-dev-server --config=webpack.config.js"
  }
}
3. Start the Visual Studio debugger to make sure IISExpress is running
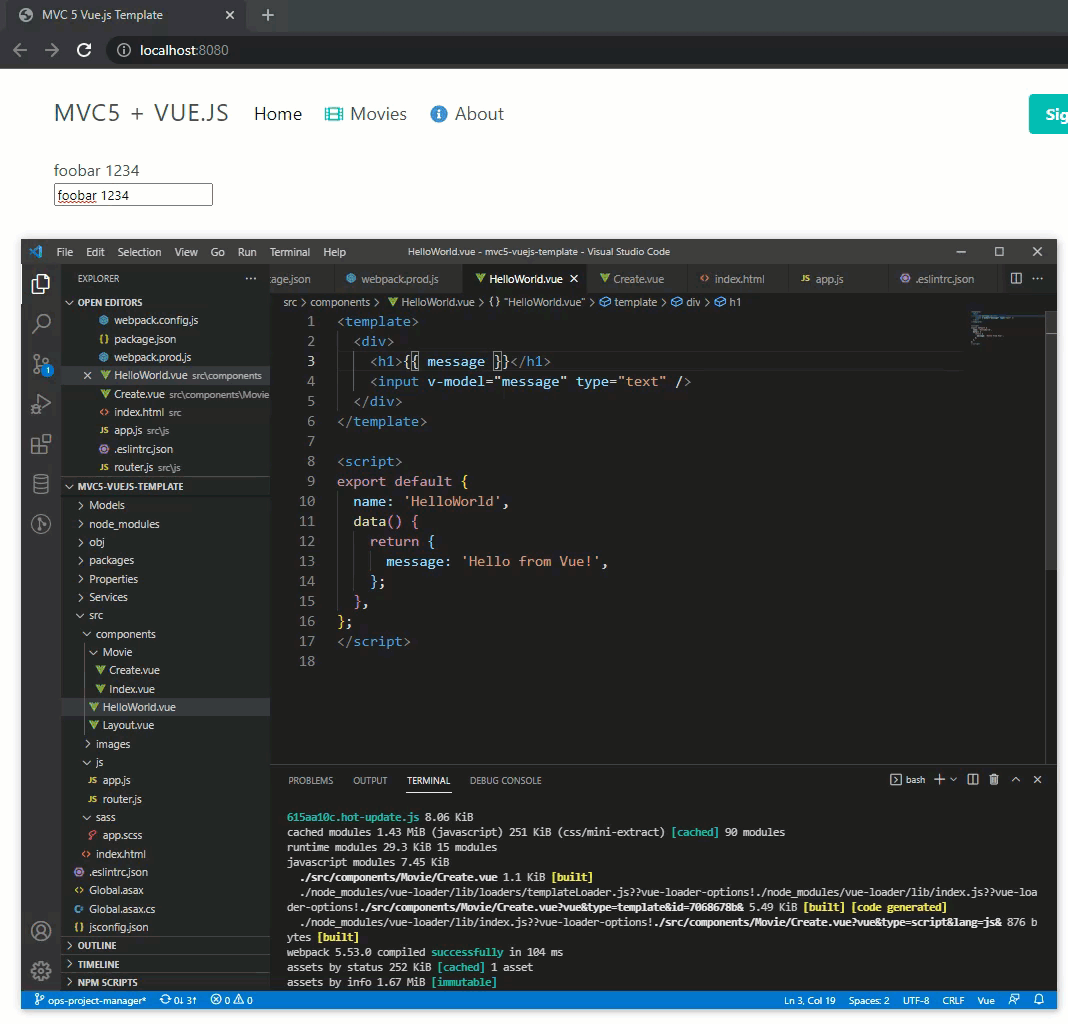
4. Start the dev server by running npm run hot
If everything is set up correctly, your browser should open automatically and you should be able to interact with your SPA on port 8080. All of the API requests should be proxied to IISExpress, which you can confirm by setting breakpoints in the controller.
Most importantly, when you edit and save a Vue file, the page should reload with your changes almost instantaneously. And as long as you are changing code inside of a <template> tag, the vue-loader is utilized to preserve the current Vue state while swapping in the new component!
This is so, so valuable, especially if you are working on part of part of the app which requires a deep level of interaction. For instance, if you are working a report that loads a ton of data, now you no longer have to refresh and reload that data on every code change. This will greatly increase your efficiency and help you work so much faster.
Browser-sync
One more optional step is to add Browser-sync. If you plan to test in multiple browsers or multiple viewport sizes, you can use browser-sync to test everything at once. All you have to do is set up Browser-sync to proxy from Webpack DevServer, then you can open multiple browser windows and they will stay in sync.
1. Pull in Browser-sync dependencies
$ npm install i -D browser-sync browser-sync-webpack-plugin2. Add a new webpack config file called webpack.browsersync.js
const { merge } = require('webpack-merge');
const baseConfig = require('./webpack.config');
const BrowserSyncPlugin = require('browser-sync-webpack-plugin');

module.exports = merge(baseConfig, {
  plugins: [
    new BrowserSyncPlugin({
     host: 'localhost',
     port: '3000',
     // proxy the webpack dev server
     proxy: 'http://localhost:8080',
    },
    {
     reload: false
    }),
  ],
});
3. Add a new script to package.json to run Browser-sync
{
  "scripts": {
    "sync": "webpack-dev-server --config=webpack.browsersync.js",
  }
}4. Run the new script
$ npm run sync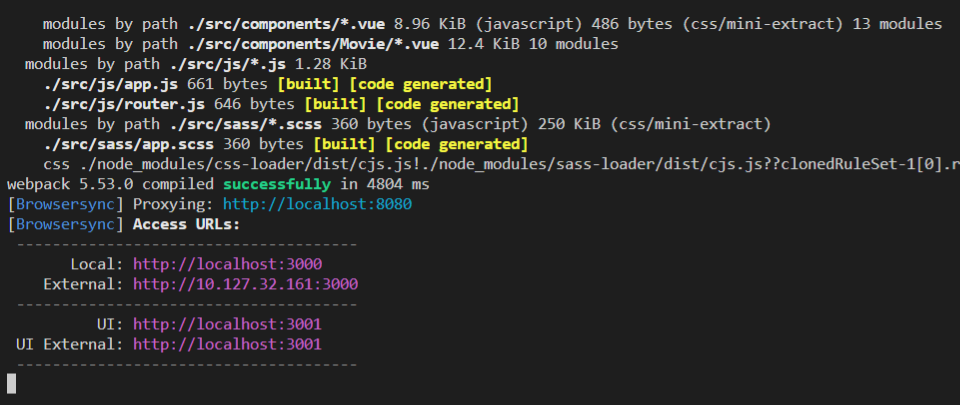
Now you can open the web service running at port 3000. Try opening multiple browsers and notice that whatever actions you make in one window should be mirrored into the others. This is great for testing different browsers, or for testing different viewport sizes at the same time.
Conclusion
Now our MVC SPA project is completely set up for rapid development in Vue.js. By integrating the webpack build into MS Build, we have ensured that any developer working on this project will not miss the critical step of building the client-side assets. Auto linting enforces code standards and helps avoid build errors, and hot module reloading dramatically speeds up the development loop.
Thanks for reading!