Home Assistant + Nginx: Unencrypted Local Traffic

In this post, I will explain some of the hidden benefits of using a reverse proxy to keep local connections to Home Assistant unencrypted. Importantly, I will explain in simple terms what a reverse proxy is, and what it is doing under the hood. Finally, I will show how I reconfigured my Home Assistant from SSL-only to a hybrid setup using Nginx.
Full Encryption with DuckDNS
Until very recently, I have been using the DuckDNS add-on to always enforce HTTPS encryption when communicating with Home Assistant. This was the recommended way to set things up when I was first learning Home Assistant, and for over a year I have appreciated the simplicity of the setup. Under this configuration, all connections must be https or they will be rejected by the web server.
The main drawback of this setup is that using a local IP in the address bar will trigger SSL certificate errors in your browser. The certificate stored in Home Assistant is only verified for the duckdns.org domain name, so you will get errors if you use anything else. Most of the time you are using the domain name anyways, but there are many cases where you have to use the local address instead. For example, if you want to connect to a local service running on a different port such as Phoscon or Node-RED, you have to use the IP and port number.
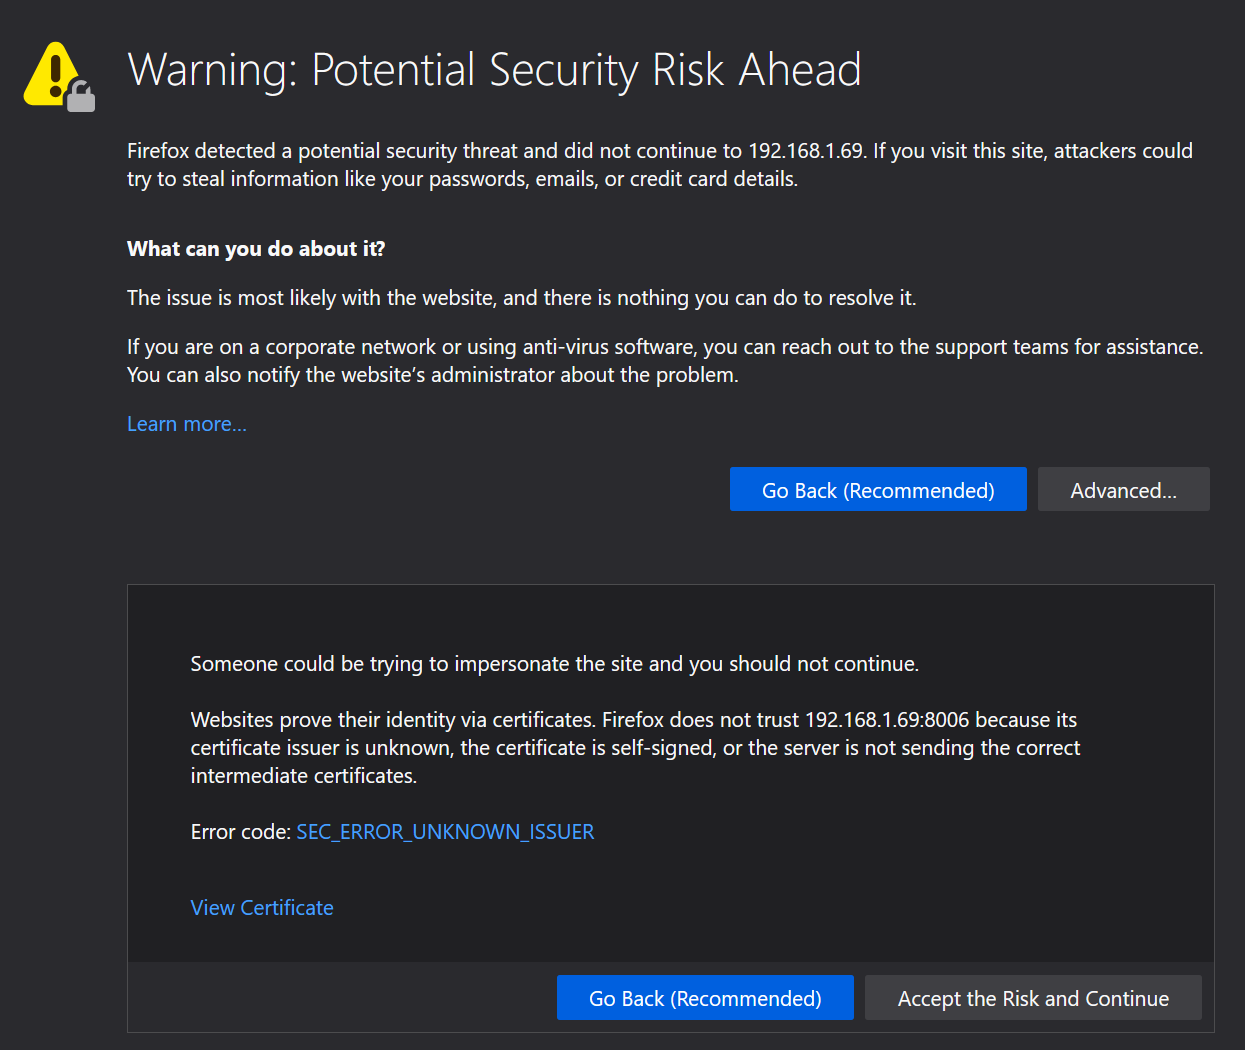
While inelegant, SSL errors are only a minor annoyance if you know to expect them. You can ignore the warnings every time, or add a rule to permanently trust the IP address. The worst problem I had was that the android companion app had no options for ignoring SSL certificate errors and I could never get it to work using a local address.
The Tipping Point
The day that I finally switched to Nginx came when I was troubleshooting latency in my setup. I was setting up my Konnected alarm panel to integrate my house's window and door sensors into home assistant. I wanted to play a chime any time a door was opened, but there was a significant delay of up to 5 seconds. I tried a bunch of ideas until I realized the issue: SSL encryption is not free.
Some quick googling confirmed my suspicion – encrypting and decrypting every packet can be very taxing for low-powered hardware like Konnected's NodeMcu boards. As a proof-of-concept, I temporarily turned off SSL and all of my latency problems disappeared. Sensors began to respond almost instantaneously! A dramatic improvement.
See thread here for a detailed explanation from Nate, the founder of Konnected.
Nginx Reverse Proxy Explained
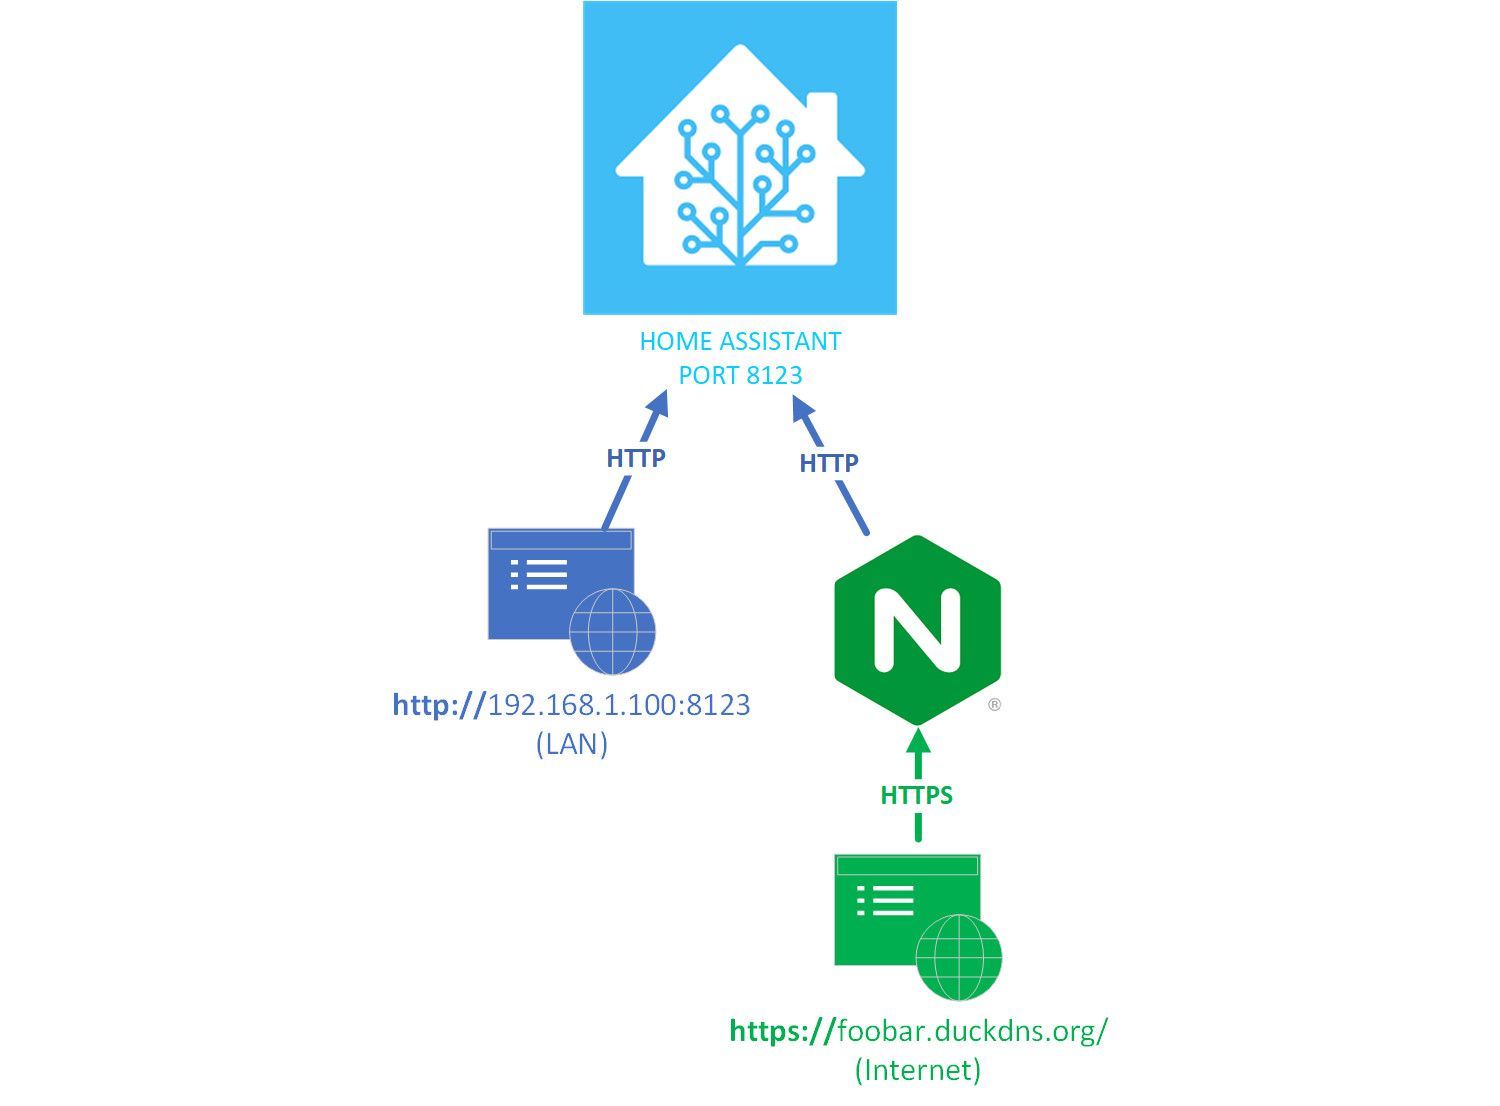
The basic idea of the reverse proxy setup is to only have traffic encrypted for a certain entry-point, like your DuckDNS domain name. The reverse proxy is a wrapper around home assistant that accepts web requests and routes them according to your configuration.
The first step to setting up the proxy is to install the NGINX Home Assistant SSL proxy add-on (full guide at the end of this post). At this point, it is worth understanding how the reverse proxy works so that you can properly configure it and troubleshoot any issues. Looking at the add-on configuration page, we see some port numbers and domain name settings that look familiar, but it's not clear how it all fits together.
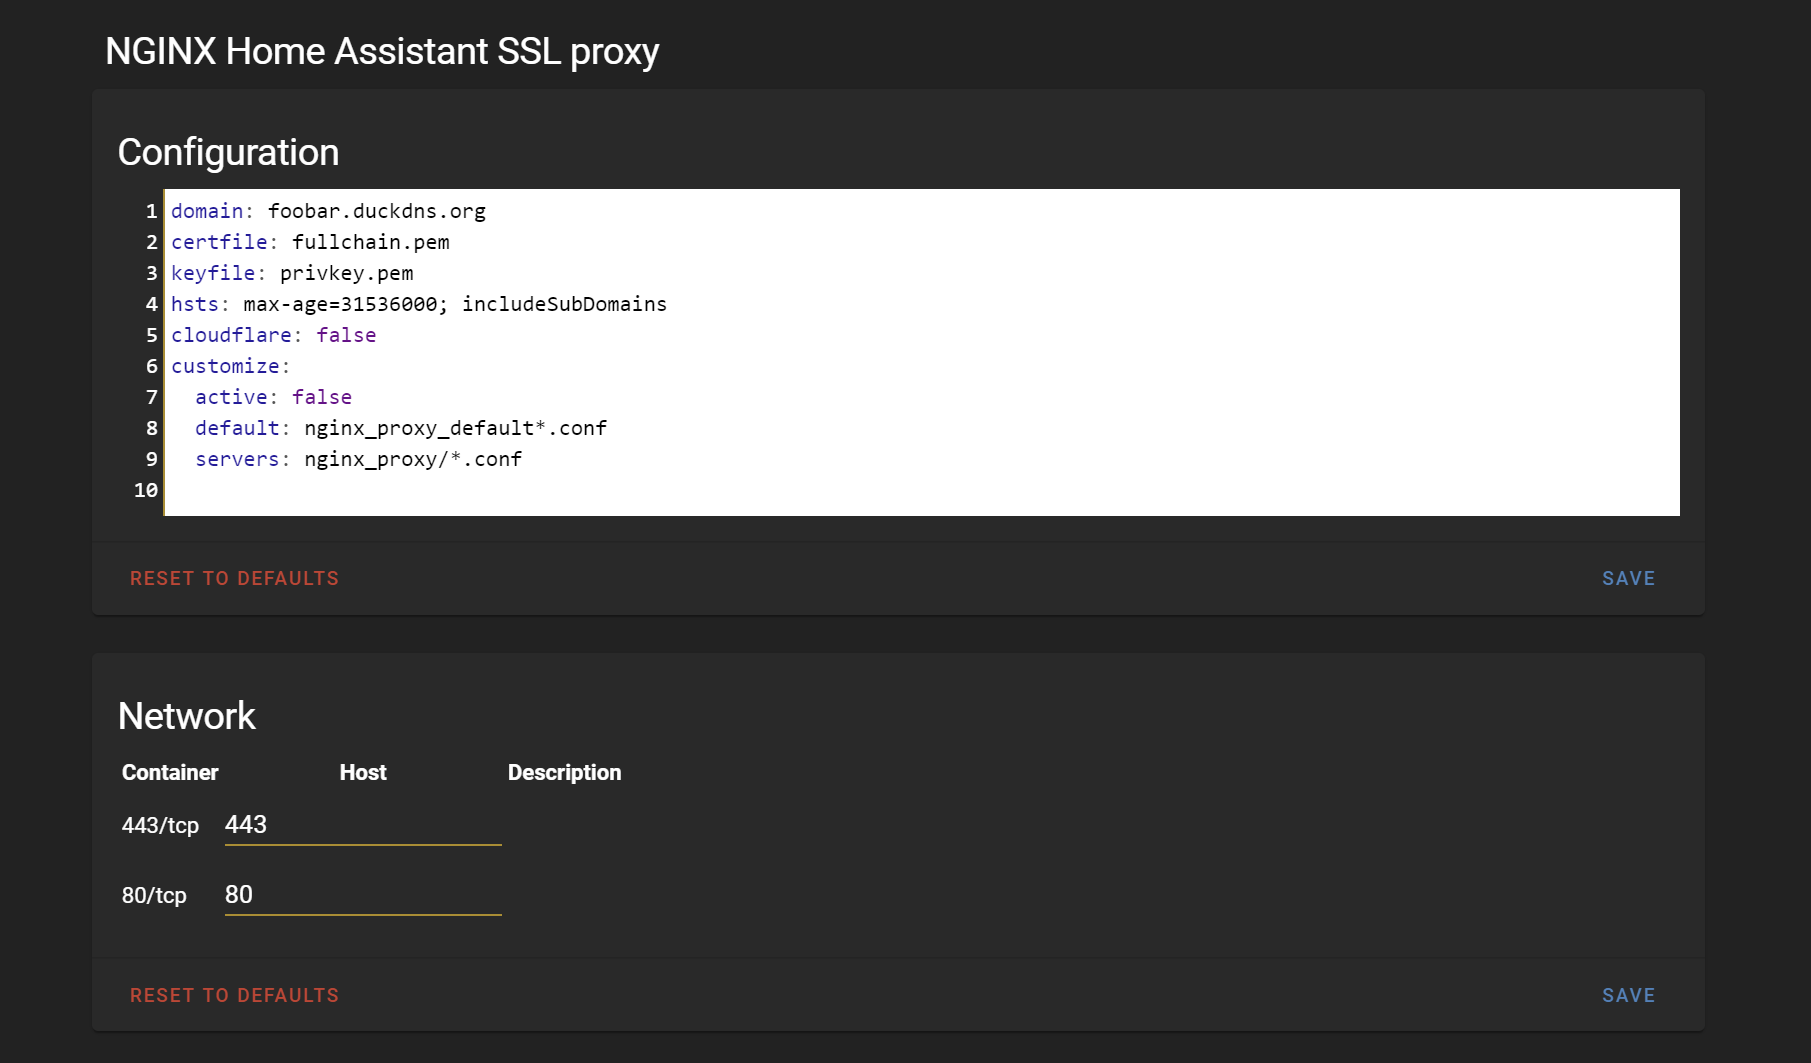
Port 443 is the HTTPS port, so that makes sense. But why is port 80 in there? Aren't we using port 8123 for HTTP connections? And why is port 8123 nowhere to be found?
To answer these questions, we only need to look at the .conf file that the add-on is using under the hood. The source code is available on github here: https://github.com/home-assistant/hassio-addons/blob/master/nginx_proxy/data/nginx.conf
Let's break it down and try to make sense of what Nginx is doing here...
nginx.conf
server {
    server_name %%DOMAIN%%;

    # These shouldn't need to be changed
    listen 80;
    return 301 https://$host$request_uri;
}
Let's zoom in on the server block above. This block tells Nginx to listen on port 80, the standard port for HTTP, for any requests to the %DOMAIN% variable (note that we configured this variable in Home Assistant to match our DuckDNS domain name). Next, we are telling Nginx to return a 301 redirect to the same URL, but we are changing the protocol to https.
Effectively, this means if you navigate to http://foobar.duckdns.org/, you will automatically be redirected to https://foobar.duckdns.org/. This explains why port 80 is configured on the HA add-on config screen – we are setting up the listening port so that nginx can redirect in case you omit the https protocol in your web request!
server {
    server_name %%DOMAIN%%;

    ssl_session_timeout 1d;
    ssl_session_cache shared:MozSSL:10m;
    ssl_session_tickets off;
    ssl_certificate /ssl/%%FULLCHAIN%%;
    ssl_certificate_key /ssl/%%PRIVKEY%%;

    # dhparams file
    ssl_dhparam /data/dhparams.pem;

    listen 443 ssl http2;
    %%HSTS%%

    # intermediate configuration
    ssl_protocols TLSv1.2 TLSv1.3;
    ssl_ciphers ECDHE-ECDSA-AES128-GCM-SHA256:ECDHE-RSA-AES128-GCM-SHA256:ECDHE-ECDSA-AES256-GCM-SHA384:ECDHE-RSA-AES256-GCM-SHA384:ECDHE-ECDSA-CHACHA20-POLY1305:ECDHE-RSA-CHACHA20-POLY1305:DHE-RSA-AES128-GCM-SHA256:DHE-RSA-AES256-GCM-SHA384;
    ssl_prefer_server_ciphers off;

    proxy_buffering off;

    #include /share/nginx_proxy_default*.conf;

    location / {
        proxy_pass http://homeassistant.local.hass.io:8123;
        proxy_set_header Host $host;
        proxy_redirect http:// https://;
        proxy_http_version 1.1;
        proxy_set_header X-Forwarded-For $proxy_add_x_forwarded_for;
        proxy_set_header Upgrade $http_upgrade;
        proxy_set_header Connection $connection_upgrade;
    }
}
This next server block looks more noisy, but we can pick out some elements that look familiar. Again, we are listening for requests on the pre-configured domain name, but this time we are listening on port 443, the standard port for HTTPS. We also see references to the variables %FULLCHAIN% and %PRIVKEY% which point to our SSL certificate files. So, this is obviously where we are telling Nginx to listen for HTTPS connections.
At the very end, notice the location block. This is where the proxy is happening. Nginx is taking the HTTPS requests, changing the headers, and passing them on to the HA service running on unsecured port 8123. This means that all requests coming in to https://foobar.duckdns.org are proxied to http://localhost:8123.
In summary, this block is telling Nginx to accept HTTPS connections, and proxy those requests in an unencrypted fashion to Home Assistant running on port 8123. Internally, Nginx is accessing HA in the same way you would from your local network. But from outside of your network, this is all masked behind the proxy.
Recap
Now we have a full picture of what the proxy does, and what it does not do. Nginx is a wrapper around Home Assistant that intercepts web requests coming in on ports 80 and 443. If we make a request on port 80, it redirects to 443. Finally, all requests on port 443 are proxied to 8123 internally.
Note that the proxy does not intercept requests on port 8123. Those go straight through to Home Assistant. So how is this secure? The answer lies in your router's port forwarding. As long as you don't forward port 8123, then the only way into your HA from the outside is through one of the ports which is handled by Nginx. So, make sure you do not forward port 8123 on your router or your system will be unsecure. You only need to forward port 443 for the reverse proxy to work.
Setup Guide
If you already have SSL set up on Home Assistant, the first step is to disable SSL so that you can do everything with unencrypted http on port 8123. If you aren't able to access port 8123 from your local network, then Nginx won't be able to either. This took me a while to figure out – I had to start by first removing the http config from my configuration.yaml:
# http:
  # base_url: !secret http_base_url
  # ssl_certificate: /ssl/fullchain.pem
# ssl_key: /ssl/privkey.pemOnce you have ensured that this code is removed, check that you can access your home assistant locally, using http and port 8123, e.g. http://192.168.1.100:8123.
Now, you can install the Nginx add-on and follow the included documentation to set it up. Once you are up and running, test out some different URLs:
http://192.168.1.100:8123- using the local IP and port 8123 should work over http. This is how you will connect from your local network.https://192.168.1.100:8123- using the local IP and port 8123 should not work over https. Nginx is looking for the duckdns domain name for https connections, so you will get an SSL errorhttps://192.168.1.100- even if you omit the port number, Nginx will still see that you are using https and reject this requesthttps://foobar.duckdns.org- Nginx should proxy and work as expectedhttp://foobar.duckdns.org- Nginx will instantly redirect to use https instead, and everything should work normally
Finally, if you are migrating from an all-SSL setup, you will need to update any config settings that use URLs like #2 above. Anything that connected locally using HTTPS will need to be updated to use http now. In my case, I had to update all of my android devices and tablet kiosks, and various services that were making local API calls to Home Assistant like my CPU temperature sensor.
Conclusion
If you are using SSL to access Home Assistant remotely, you should really consider setting up a reverse proxy. It's a lot to wrap your brain around if you are unfamiliar with web server architecture, but it is well worth the effort to eliminate the overhead of encryption, especially if you are using Raspberry Pis or ESP devices.
Thanks for reading!