Home Assistant: Add Camera Snapshots to Push Notifications
In this post I will share an easy way to add real-time camera snapshots to your Home Assistant push notifications. This is a great way to level up your push notifications, allowing you to actually see what is happening at the instant a notification was pushed.

In this post I will share an easy way to add real-time camera snapshots to your Home Assistant push notifications. This is a great way to level up your push notifications, allowing you to actually see what is happening at the instant a notification was pushed. For example, you can send an image from your garage camera when the cover is opened, or from your wall mounted tablet when the security system is disarmed.
Home Assistant does allow you to send snapshots from a camera entity, but the advantage of my approach is that it reaches directly into the camera to get a snapshot. This eliminates the need to use camera entities, which are often plagued with latency, compression, and bandwidth issues. All you need to make this work is a camera with an HTTP endpoint for pulling the snapshots. I will show some specific examples using my Blue Iris cameras and my Fully Kiosk-enabled tablets, and I will share a reusable flow that you can plug in to your Node-RED config.
HTTP Endpoint
The first step is to figure out the HTTP endpoint to grab a snapshot from your camera. Most IP cameras and NVR systems will provide a way to pull a snapshot, so check with your manufacturer. Test the endpoint by opening it in a browser and ensure you get an image with the current timestamp.
The URL for a BlueIris camera looks something like this:
http://<blue_iris_ip>:<port>/image/<camera_name>?s=50And the URL for a Fully Kiosk-enabled Android tablet looks like this:
http://<tablet_ip>:2323/?cmd=getCamshot&password=<remote_admin_password>Note: you have to set up Remote Admin in Fully Kiosk and turn on a setting called "Enable Camshot on Remote Admin"
Example #1: Garage Notifications
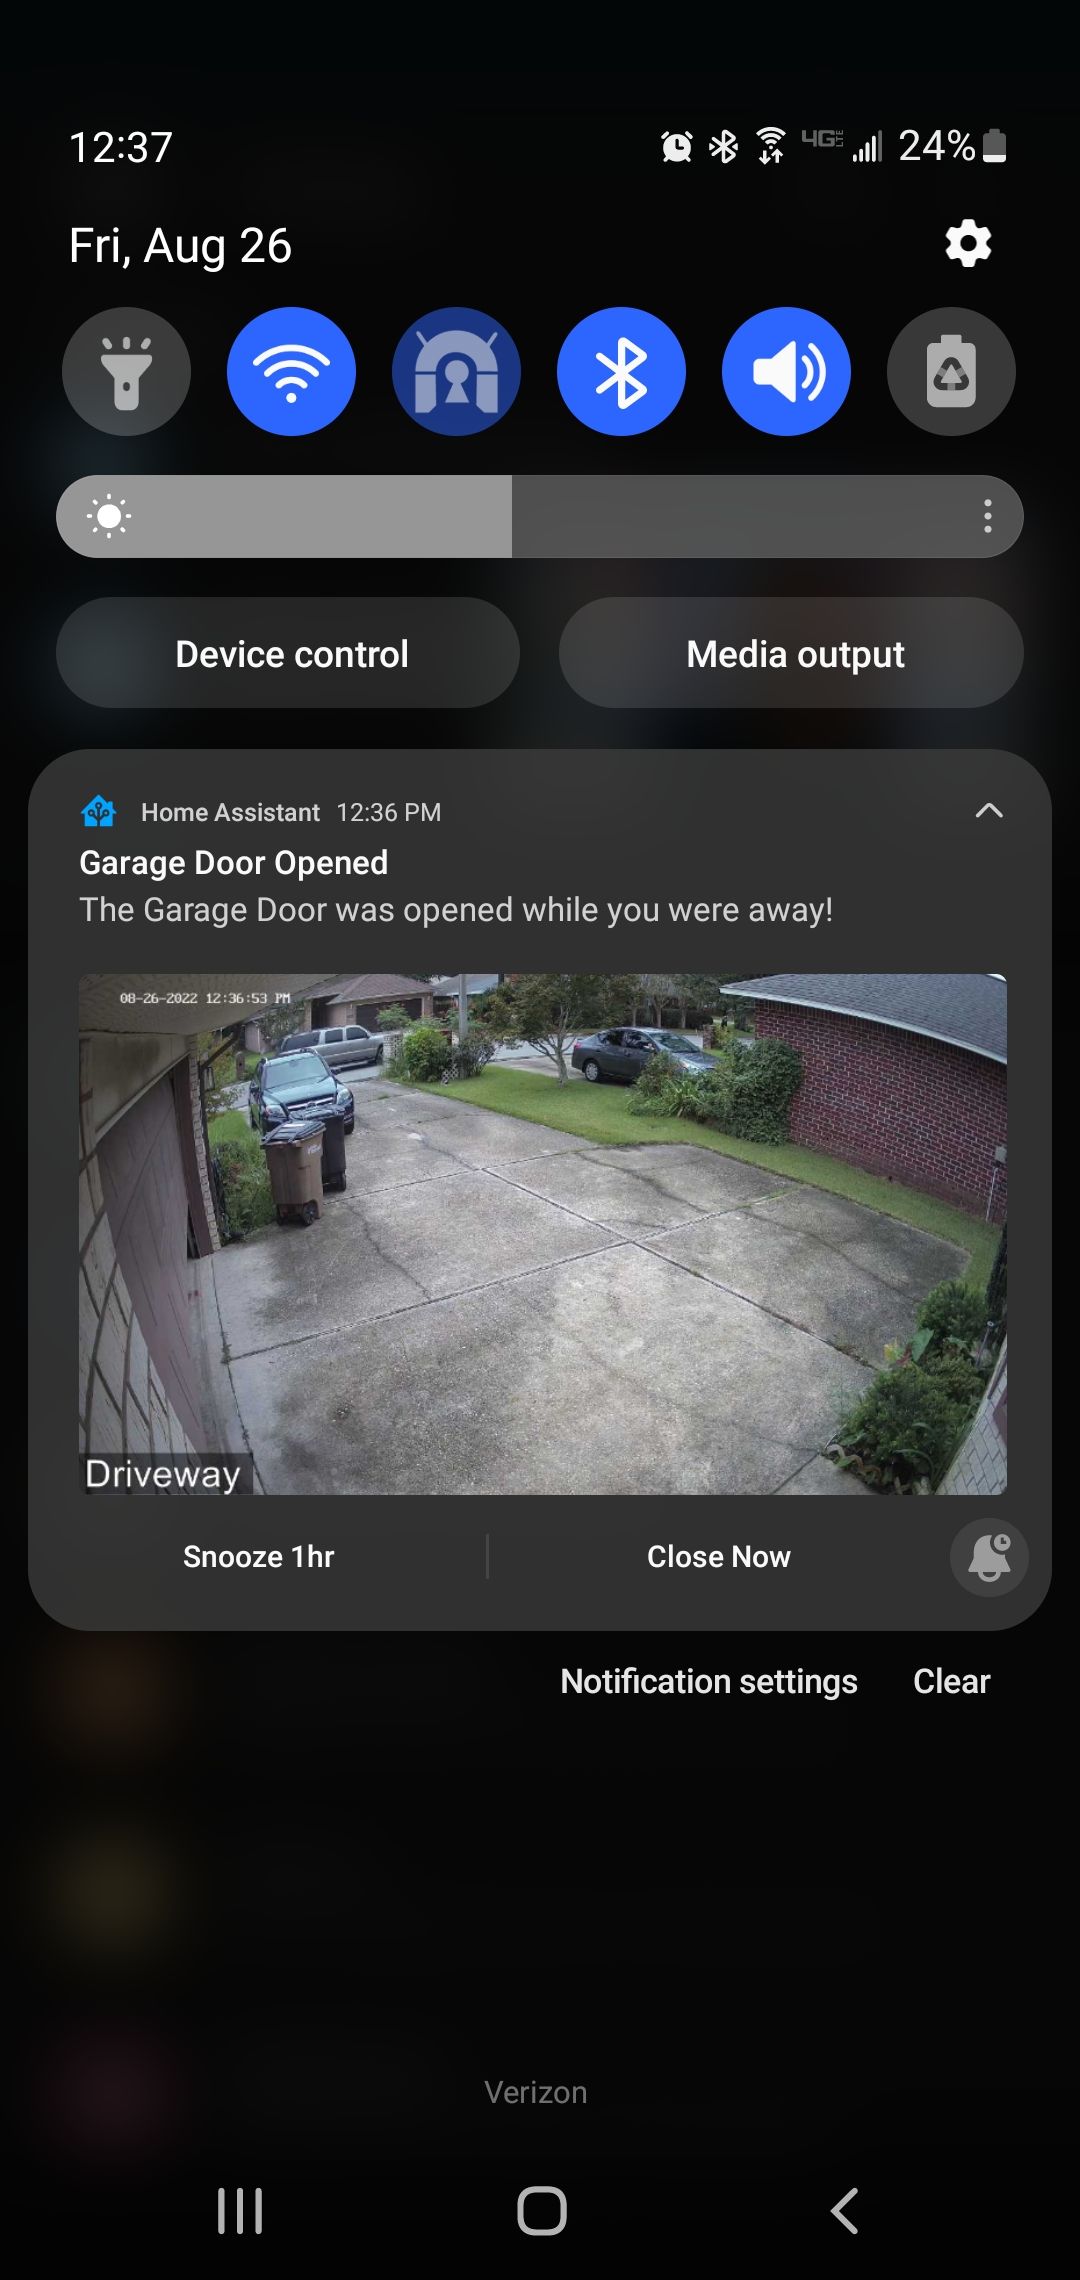
The flow below triggers when my garage door starts to open, only when I am away from the house. Next, it calls my Blue Iris HTTP endpoint using the user and password stored by in the credentials node. If the HTTP request succeeds, the image is saved to local storage and sent out as a push notification. If the request fails, an error is logged and the request is sent out with no image. This way, I always get a notification even if the images are not working for some reason.

Below is a screenshot of the result. The notifications are impressively quick, and there is almost no latency between the trigger and the image. I actually use this same approach for my Video Doorbell and the images always line up with the moment that you press the chime button.

And here is the code:
[{"id":"da1e2737d73816ac","type":"trigger-state","z":"b0ef49e9e773bb6d","name":"When Garage Door Is Opening","server":"a86c4410.e2a568","version":2,"exposeToHomeAssistant":false,"haConfig":[{"property":"name","value":""},{"property":"icon","value":""}],"entityid":"cover.garage_door","entityidfiltertype":"exact","debugenabled":false,"constraints":[{"targetType":"this_entity","targetValue":"","propertyType":"current_state","propertyValue":"new_state.state","comparatorType":"is","comparatorValueDatatype":"str","comparatorValue":"opening"}],"inputs":0,"outputs":2,"customoutputs":[],"outputinitially":false,"state_type":"str","enableInput":false,"x":230,"y":200,"wires":[["b6a00b357813dc27"],[]]},{"id":"b6a00b357813dc27","type":"api-current-state","z":"b0ef49e9e773bb6d","name":"And Andrew Is Not Home","server":"a86c4410.e2a568","version":3,"outputs":2,"halt_if":"home","halt_if_type":"str","halt_if_compare":"is_not","entity_id":"person.andrew","state_type":"str","blockInputOverrides":false,"outputProperties":[{"property":"payload","propertyType":"msg","value":"","valueType":"entityState"},{"property":"data","propertyType":"msg","value":"","valueType":"entity"}],"for":"0","forType":"num","forUnits":"minutes","override_topic":false,"state_location":"payload","override_payload":"msg","entity_location":"data","override_data":"msg","x":510,"y":200,"wires":[["7523d56d77849f46"],[]]},{"id":"912b86806fded094","type":"inject","z":"b0ef49e9e773bb6d","name":"Send Now","props":[{"p":"payload"},{"p":"topic","vt":"str"}],"repeat":"","crontab":"","once":false,"onceDelay":0.1,"topic":"","payload":"","payloadType":"date","x":180,"y":300,"wires":[["7523d56d77849f46"]]},{"id":"7074fde8ae85eb77","type":"comment","z":"b0ef49e9e773bb6d","name":"Trigger","info":"","x":150,"y":160,"wires":[]},{"id":"91d547e9b9e54664","type":"comment","z":"b0ef49e9e773bb6d","name":"Condition","info":"","x":460,"y":160,"wires":[]},{"id":"7523d56d77849f46","type":"credentials","z":"b0ef49e9e773bb6d","name":"","props":[{"value":"endpoint","type":"msg"},{"value":"user","type":"msg"},{"value":"password","type":"msg"},{"value":"local_storage_path","type":"msg"},{"value":"notify_service","type":"msg"}],"x":370,"y":300,"wires":[["3a65534795823a90"]]},{"id":"40a64f748838890e","type":"http request","z":"b0ef49e9e773bb6d","name":"GET Image","method":"GET","ret":"bin","paytoqs":"ignore","url":"","tls":"","persist":false,"proxy":"","insecureHTTPParser":false,"authType":"","senderr":false,"headers":[],"x":750,"y":300,"wires":[["b4da7befe3738159"]]},{"id":"f29e35e66db1823f","type":"file","z":"b0ef49e9e773bb6d","name":"Write File","filename":"\"/config/www/\" & $$.local_storage_path","filenameType":"jsonata","appendNewline":false,"createDir":false,"overwriteFile":"true","encoding":"none","x":1120,"y":280,"wires":[["83e1d989aa1b4855"]]},{"id":"3a65534795823a90","type":"change","z":"b0ef49e9e773bb6d","name":"Set Request Headers","rules":[{"t":"set","p":"url","pt":"msg","to":"endpoint","tot":"msg"},{"t":"set","p":"headers","pt":"msg","to":"{\t \"Authorization\": 'Basic ' & $base64encode(\t $$.user & ':' & $$.password\t )\t}","tot":"jsonata"}],"action":"","property":"","from":"","to":"","reg":false,"x":560,"y":300,"wires":[["40a64f748838890e"]]},{"id":"b4da7befe3738159","type":"switch","z":"b0ef49e9e773bb6d","name":"Check Response","property":"statusCode","propertyType":"msg","rules":[{"t":"btwn","v":"200","vt":"num","v2":"299","v2t":"num"},{"t":"else"}],"checkall":"true","repair":false,"outputs":2,"x":930,"y":300,"wires":[["f29e35e66db1823f"],["6b04ee837f845b56"]]},{"id":"83e1d989aa1b4855","type":"change","z":"b0ef49e9e773bb6d","name":"","rules":[{"t":"set","p":"image_path","pt":"msg","to":"\"local/\" & $$.local_storage_path","tot":"jsonata"}],"action":"","property":"","from":"","to":"","reg":false,"x":1300,"y":280,"wires":[["4e5c2ea1dadbe317"]]},{"id":"77db453cf42002c8","type":"function","z":"b0ef49e9e773bb6d","name":"Throw Exception","func":"throw msg.statusCode + \" status returned from http request node.\"\nreturn msg;","outputs":1,"noerr":0,"initialize":"","finalize":"","libs":[],"x":1230,"y":360,"wires":[[]]},{"id":"f3fcf7e0d93aa899","type":"comment","z":"b0ef49e9e773bb6d","name":"Credentials (see example here)","info":"endpoint = http://1.2.3.4/snapshot\nuser = someuser (if needed)\npassword = secret (if needed)\nlocal_storage_path = images/snapshots/driveway.jpg\nnotify_service = mobile_app_galaxy_phone","x":430,"y":340,"wires":[]},{"id":"dd65180c2215a6bf","type":"debug","z":"b0ef49e9e773bb6d","name":"debug 3","active":true,"tosidebar":true,"console":false,"tostatus":false,"complete":"true","targetType":"full","statusVal":"","statusType":"auto","x":1200,"y":400,"wires":[]},{"id":"4e5c2ea1dadbe317","type":"api-call-service","z":"b0ef49e9e773bb6d","name":"Notify","server":"a86c4410.e2a568","version":5,"debugenabled":false,"domain":"notify","service":"{{ flow.notify_service }}","areaId":[],"deviceId":[],"entityId":[],"data":"{\t \"title\":\"Garage Door Opened\",\t \"message\":\"The Garage Door was opened while you were away!\",\t \"data\":{\t \"clickAction\":\"/\",\t \"tag\":\"garage_opened_while_away\",\t \"image\":$$.image_path,\t \"ttl\":0,\t \"priority\":\"high\",\t \"channel\":\"Doorbell\",\t \"actions\":[\t {\t \"action\":\"snooze_alerts_1_hour\",\t \"title\":\"Snooze 1hr\"\t },\t {\t \"action\":\"close_garage_door\",\t \"title\":\"Close Now\"\t }\t ]\t }\t}","dataType":"jsonata","mergeContext":"","mustacheAltTags":false,"outputProperties":[],"queue":"none","x":1470,"y":320,"wires":[[]]},{"id":"6b04ee837f845b56","type":"junction","z":"b0ef49e9e773bb6d","x":1080,"y":320,"wires":[["77db453cf42002c8","dd65180c2215a6bf","4e5c2ea1dadbe317"]]},{"id":"a86c4410.e2a568","type":"server","name":"Home Assistant","version":4,"addon":true,"rejectUnauthorizedCerts":true,"ha_boolean":"y|yes|true|on|home|open","connectionDelay":true,"cacheJson":true,"heartbeat":false,"heartbeatInterval":30,"areaSelector":"friendlyName","deviceSelector":"friendlyName","entitySelector":"friendlyName","statusSeparator":"at: ","statusYear":"hidden","statusMonth":"short","statusDay":"numeric","statusHourCycle":"h23","statusTimeFormat":"h:m"}]- Copy the flow above into your editor
- Change the trigger and conditions to suit your needs
- Fill out the credentials node with your endpoint, username, password, and so on
- Set up your notification in the Notify node
Note: this code depends on the Credentials plugin. Make sure to install this plugin first.
Example #2: Alarm Panel Notifications
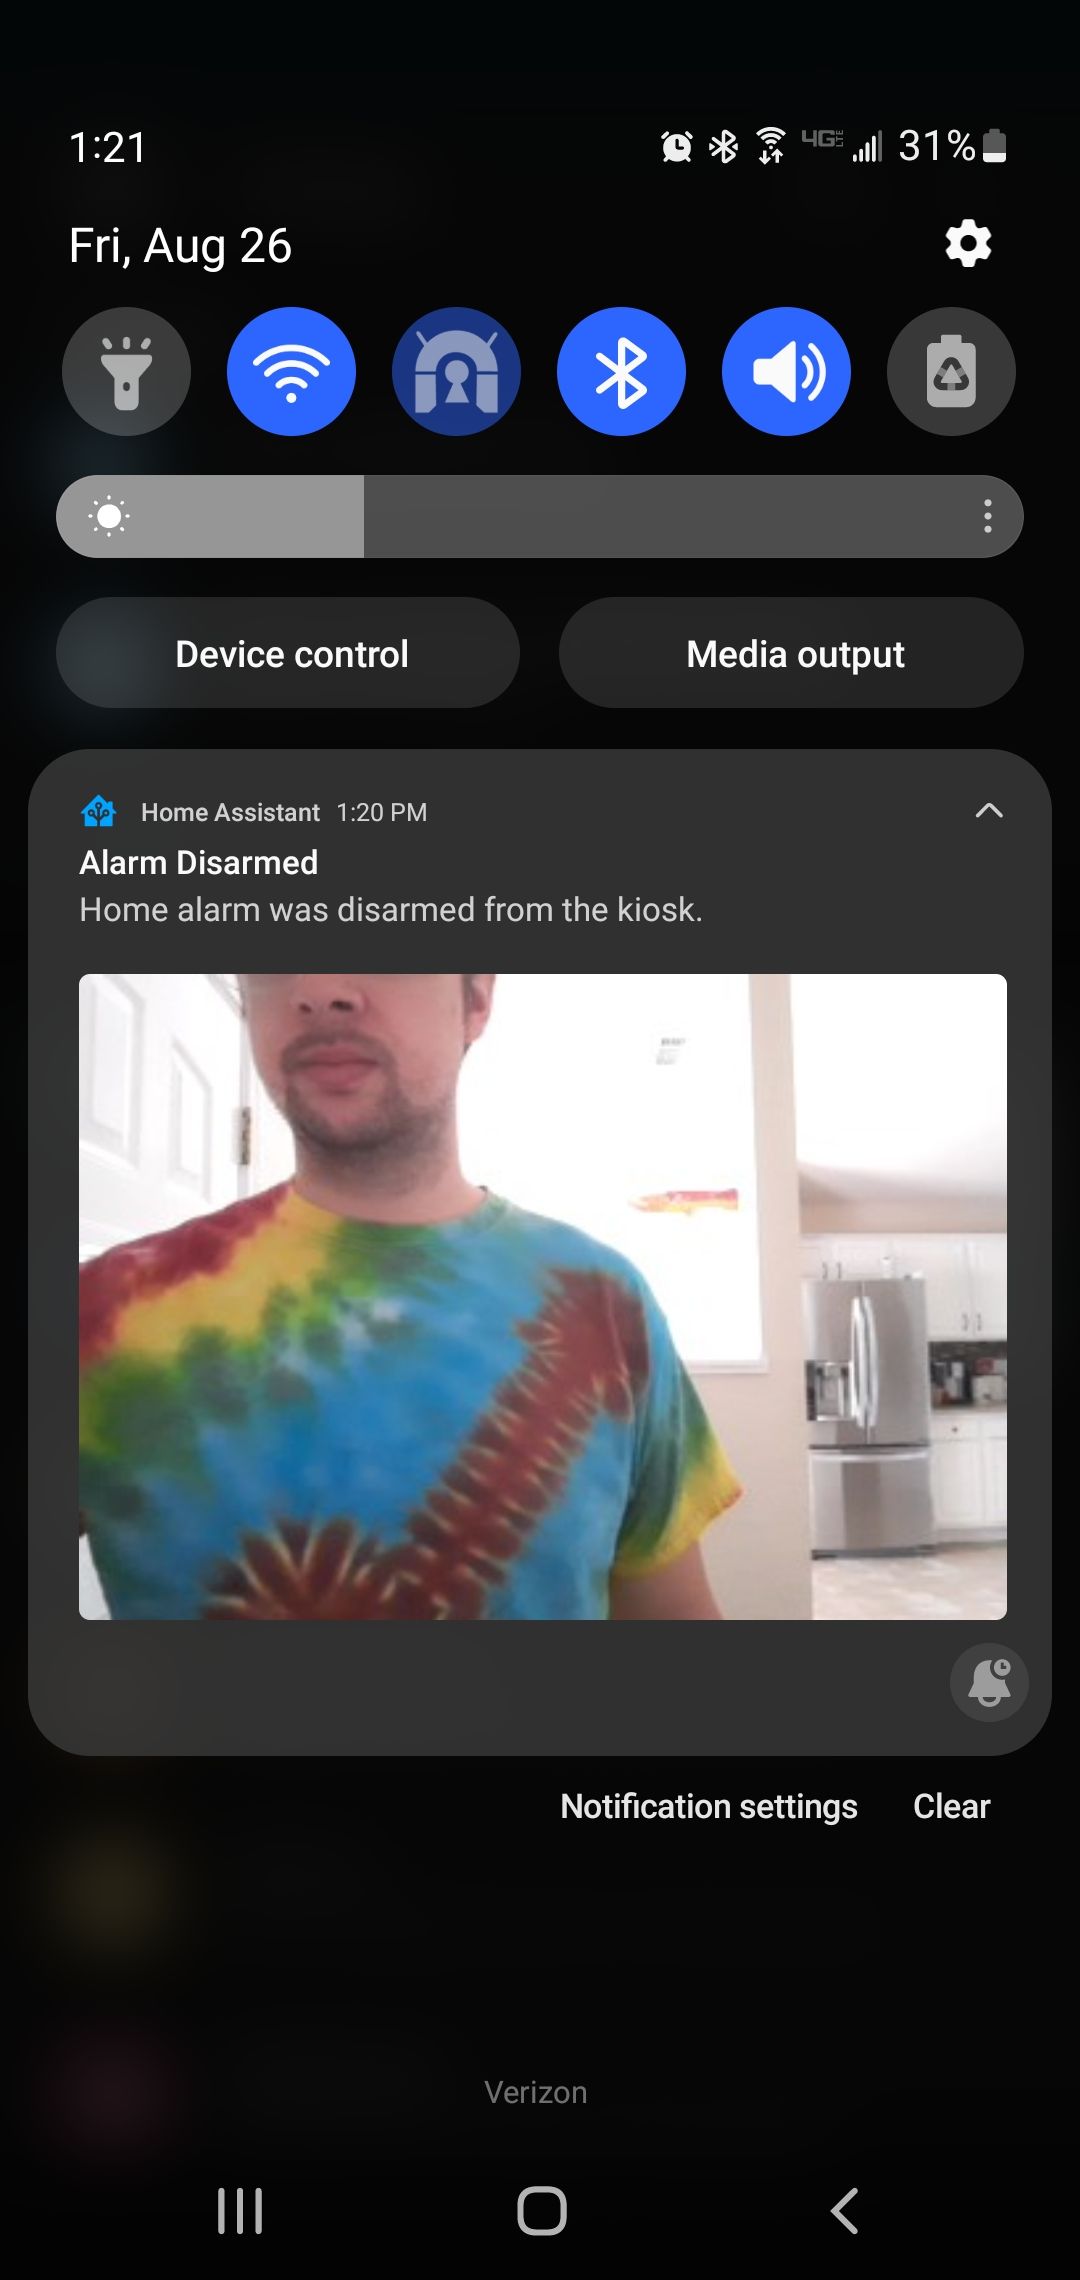
Here is another example where I enhanced the push notifications for my home alarm system. The flow is very similar to the previous example, all I had to do was change the settings as outlined in the previous example so that it pulls images from my kiosk tablet.

Conclusion
With this template you can now enhance all of your push notifications to pull images from relevant cameras in your home. You can even extend this concept to push images out to other services, like a file share or a Telegram channel. Real-time images add valuable context to your notifications and make your Home Assistant even more useful. Thanks for reading!
